10 Paper Airplane Drawing Ideas
Last rainy Sunday, my nephew came over with a stack of printer paper and one very serious request: he wanted to draw paper airplanes, not fold them. I cleared the kitchen table, put the good pencils in the middle, and sat down with him. An hour later we had planes flying through stars, rainbows, and one very lopsided outer space, and I realised how much fun this simple subject can be when you stop worrying about getting it perfect. These ten ideas are the ones we actually tried at that table, in the order we drew them, with the little things I learned along the way.

3 Quick Notes Before You Sketch
- Start with a light pencil: sketch the plane in 2H or HB first, because you will want to move a wing or two before you commit to ink.
- Keep the paper plain: smooth 120 gsm copy paper takes pencil and coloured pencil far better than lined notebook paper, and it costs almost nothing.
- Draw the plane before the background: once the plane sits right on the page, the clouds, stars, or map around it almost place themselves.
1. Basic Paper Airplane Outline

I always start here, even now, because the plain outline teaches you everything else in this list. I tried this first with my nephew and we both drew the same simple shape: one long triangle for the body, a second folded edge along the top, and a small notch where the tail creases. His first attempt looked more like a paper dart than a plane, which honestly made us both laugh, and the second one was already recognisable. What worked for me was drawing the centre line first, very lightly, then building both wings off it so the plane stays symmetrical. I shaded one wing with the side of a soft pencil, just enough grey to suggest a fold, and left the other wing white. It took about ten minutes and a sheet of ordinary copy paper, and it gave my nephew the confidence to try the fancier versions afterwards. If you have never drawn a plane before, this is the warm-up that makes the rest of the afternoon easy.
Good to know: this is the best first drawing for a rainy afternoon at home or a quiet classroom warm-up, and it suits anyone who wants a quick win before moving on to backgrounds.
2. Paper Airplane in Flight

A still plane on a blank page can feel a bit lonely, so the next thing I tried was giving mine some movement. I tilted the nose upward, drew three curved lines trailing behind the tail, and suddenly the same little triangle looked like it was climbing into the sky. My nephew went the other way and drew his plane swooping down toward a landing strip made of two pencil lines, which worked just as well. I added a few loose clouds with a grey pencil and a pale blue wash from a watercolour pencil, letting the colour dry for about fifteen minutes before I touched it again. What made it work was keeping the motion lines light and uneven, because perfectly parallel lines look stiff. This is one of those easy paintings for beginners that actually looks finished once you add the sky, and I pinned ours to the fridge the same evening.
Try this: draw the plane at a steep angle and let the motion lines curve, then hang the finished page in a child’s bedroom or pin it above a desk where it catches the light.
3. Paper Airplane with a Trail of Stars

This one came from my nephew asking whether a paper plane could carry wishes, which is a question I was not going to argue with. I drew the plane small, high on the page, and let a trail of stars spill out behind it in a loose curve, some as simple four-point sparkles and some as tiny dots. I used a gold gel pen for the stars, which cost about two euros at the stationery shop near my flat, and the metallic shine made the whole page feel a bit magical without any extra effort. The plane itself stayed plain pencil, which made the gold stand out even more. We talked while we drew about what wishes we would send up there, and I will admit mine was embarrassingly practical. The drawing took maybe twenty minutes, and most of that was me deciding where each star should go instead of just letting them scatter naturally.
Make it yours: swap the stars for tiny hearts or snowflakes, and this becomes a lovely handmade card for a birthday or a good-luck note before an exam.
4. Paper Airplane with Clouds and Sun

On a grey Munich morning, drawing a sunny sky felt like a small act of rebellion, so this was the page I enjoyed most. I put a big round sun in the top corner with short straight rays, then drew the plane cutting through two soft clouds in the middle of the page. I coloured the sun with a warm yellow pencil and left the clouds mostly white with just a touch of pale grey underneath, which is what makes them look puffy instead of flat. My nephew made his sun enormous, nearly half the page, and his plane tiny beside it, and honestly his version had better proportions than mine because the size contrast made the plane look far away. If you are drawing with children, this is a gentle way to practise scale without calling it a lesson. We used simple painting projects like this one all afternoon, and the sunny page is still stuck to my kitchen wall.
Budget tip: you need nothing more than a yellow, a blue, and a grey pencil for this one, so it is ideal for a classroom art session or a holiday craft table where supplies are limited.
5. Paper Airplane with a Message Banner

I first drew this version for a friend’s birthday card, because a plane towing a little banner felt more personal than a shop-bought card. I sketched the plane in the top third of the page, then drew two thin lines trailing from its tail down to a long ribbon banner with the words “Dream Big” written across it in my neatest handwriting. The letters took three tries, which is why I now pencil them in first and go over them in pen only when I am happy. My nephew wrote “Fly High” on his and added a small flag at the end of the banner, which looked better than mine. A fineliner in black, about three euros, is all you need for the lettering, and a coloured pencil for the banner keeps it cheerful. The drawing works best on a plain white card, because the message needs space to breathe.
Beginner tip: write the banner words in pencil before inking them, and save this idea for birthday cards, graduation notes, or a leaving gift for a colleague.
6. Paper Airplane in Outer Space

This is the idea that made my nephew gasp, because suddenly our little paper plane was a spaceship. I coloured the whole background a deep navy with a blue pencil, pressing hard in layers until the page looked dark enough for space, then added a ringed planet in one corner and a scattering of white stars made with the tip of a white gel pen. The plane stayed white, which made it pop against the dark sky, and I added a small rocket in the distance for scale. It took longer than the others, maybe half an hour, because layering the blue evenly across the page is slow work, but the result was worth it. I kept my hand relaxed while colouring so the background stayed smooth, and I let the page rest before adding the stars so the gel pen would not smudge. If you have a child who loves space, this is the page they will ask to draw again.
Where it works: this one shines as a poster for a child’s bedroom wall or a space-themed birthday party decoration, and it also makes a fun cover for a school science project.
7. Paper Airplane with People Riding It

I was nervous about this one, because drawing people is not my strong point, but it turned out to be the funniest page of the day. I drew two tiny figures sitting on top of the plane as if it were a flying carpet, one with a scarf blowing behind them and one waving, and I kept their faces to two dots and a smile because anything more would have looked wrong at that size. My nephew drew himself and his best friend on his plane, complete with matching red scarves, and he was so pleased with it that he asked me to photograph it for his mum. The key is keeping the people small and simple, because the plane is the star of the drawing and the riders are just along for the ride. I used a black fineliner for the outlines and a few coloured pencils for the clothes, and the whole thing took about twenty minutes once I stopped overthinking the faces.
Watch out: do not make the riders too big or the plane will look like it is sinking, and keep this playful version for storybook-style illustrations or a homemade card for a close friend.
8. Paper Airplane with Rainbow Trail
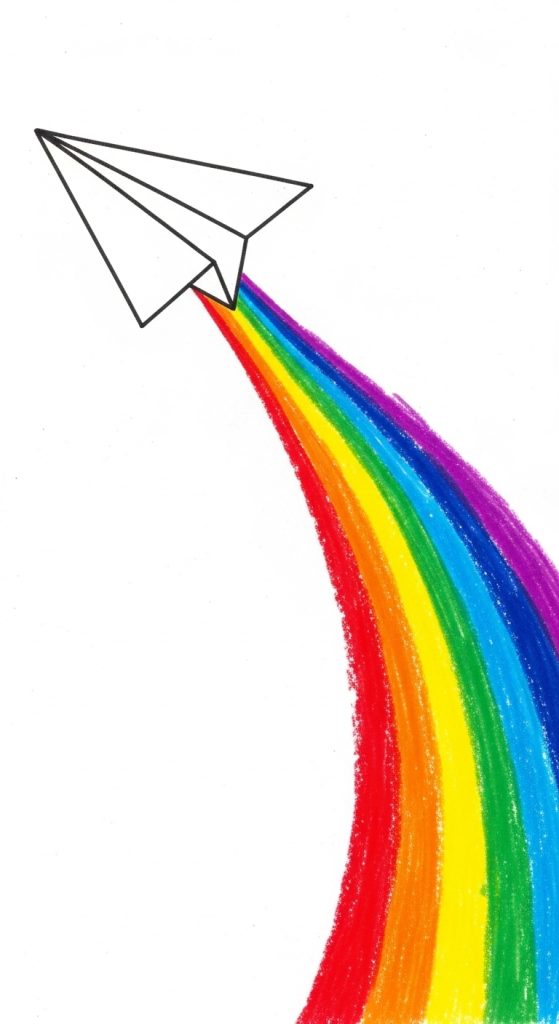
If the star trail was magical, the rainbow trail was pure joy, and this page ended up the brightest one on the table. I drew the plane in plain pencil, then gave it a wide wavy trail in red, orange, yellow, green, blue, and violet, curving across the page like a ribbon in the wind. I coloured each stripe separately and left a thin white gap between them, which keeps the colours clean instead of muddy where they meet. My nephew did his trail in thick crayon strokes, which looked wonderfully bold, while mine was softer with coloured pencils. Either way works, and the only rule I would give is to start with the lightest colour first, because yellow over red is much harder to fix than the other way round. We talked about our favourite colours while we worked, and the page dried, or rather finished, in about fifteen minutes. For anyone who loves bright colour, this is the most satisfying drawing in the whole list, and it is one of the bright, cheerful drawings I would happily repeat on a bigger sheet.
Good to know: a rainbow trail is perfect for a cheerful classroom display or a pride-month card, and it works beautifully on a larger A3 sheet where the trail has room to sweep.
9. Paper Airplane with World Map Background

This idea came from the old map I keep pinned above my desk, the one with pins in the places I have actually visited and a few more I still dream about. I drew a simplified world map in pale grey pencil, just rough continent shapes, no need for accuracy, and then placed the paper plane flying over the Atlantic with a dotted line curving behind it toward a small star marking a destination. My nephew chose Japan as his destination and drew his plane heading east with great determination, which made me smile. The dotted flight path is the detail that sells the whole drawing, so I made the dots even and spaced them closely near the plane and wider apart further back. It took about twenty-five minutes, mostly because I kept checking the shape of Africa against the map on my wall. This is the drawing I would frame for a hallway or a travel journal, because it says something about curiosity without saying a word.
Try this: mark a real destination with a tiny star and a date, and use the finished page as a travel journal cover or a farewell gift for someone moving abroad.
10. Paper Airplane in a Heart-Themed Drawing

The last drawing of the day was the softest one, and my nephew insisted we save it for his mum. I drew the plane in the centre of the page and surrounded it with small hearts in different sizes, some filled in pink, some just outlined in red, with a heart-shaped trail looping behind the tail. I used soft pastel colours, pink and lavender with a touch of red, and I kept the plane itself white so it stood out against the gentle background. My nephew added a tiny heart on the wing of his plane, which was a better idea than anything I had planned, and I promptly copied it. The drawing took only fifteen minutes, but it felt like the right ending to the afternoon, quiet after all the rainbows and rockets. I wrote “for you” in small letters underneath, and my nephew delivered it to his mum before the paper had even had time to settle. If you want a drawing that carries a feeling rather than just a technique, this is the one to try, and it sits naturally alongside other paper crafts for kids that end up as keepsakes rather than fridge art.
Make it yours: change the colours to suit the person you are drawing for, and save this idea for Valentine’s Day cards, friendship notes, or a thank-you card for a teacher.
Conclusion
By the end of that Sunday, our kitchen table was covered in paper planes, gold stars, and one very proud nephew, and I had a stack of drawings I genuinely liked. What I took away from the afternoon is that a paper airplane is a forgiving subject: it lets you practise lines, colour, and composition without the pressure of getting a face or a building exactly right. Pick the idea that makes you smile, start with a light pencil, and let the plane take you wherever it wants to go.