10 DIY Cereal Box Bird Feeder Ideas
When my nephew stayed with me for the autumn school holidays last year, it rained for four days straight and I ran out of indoor activities by Tuesday afternoon. On Wednesday I pulled the stack of empty cereal boxes I’d been saving for the recycling out of the cupboard, found a bag of birdseed I’d bought on a whim, and announced we were building bird feeders. He looked at me like I’d lost my mind. By Friday we had ten of them hanging on my balcony, and by the following Monday a blue tit had moved in like it owned the place. Everything below is what we actually built that week — with the soggy failures and the material costs left in.

1. Classic Hanging Cereal Box Bird Feeder

We started with the simplest version because my nephew was eight and his patience had limits: cut the top off a cereal box, cut a hole on each of two opposite sides, thread string through the top flaps, fill the bottom with seed, hang it from the balcony railing. The whole thing took fifteen minutes, which was exactly right for a first attempt. Our mistake was cutting the holes too small — the first blue tit that landed peered in, decided it couldn’t fit, and left, which my nephew took personally. We widened both holes to about five centimetres and the next bird went straight in. I also learned to wrap the bottom edge of the box with packing tape before hanging, because the first rain softened the cardboard at the corners and seed started leaking through. Total cost: zero, since everything came from the recycling and the junk drawer.
2. Cereal Box Feeder with Roof Cover

After the first feeder survived a week, my nephew wanted to build the birds “a proper house,” so we added a roof. We cut a triangle from a second cereal box, folded it into a peak, and glued it on top of a fresh feeder with the front cut open wide. He painted the roof red with non-toxic acrylics and declared it a fire station for birds, which is not ornithologically accurate but made him very happy. The important lesson from this one: slant the roof properly. Our first attempt was nearly flat, rain pooled in the middle, and the whole roof sagged into the box overnight like a wet tent. The second version had a proper steep peak and shed water perfectly. We also poked the hanging string through the roof peak rather than the box sides, which kept it balanced instead of tipping forward under the seed’s weight.
3. Multi-Level Cereal Box Bird Feeder

This was the ambitious Thursday project: two cereal boxes stacked to make a two-storey feeder, the top one with seed for small birds and the bottom one with a wider opening. My nephew was convinced this would attract “a whole bird family,” and honestly the engineering kept him busy for a full hour, which was the real victory. We taped the boxes together with wide packing tape around all four corners, then ran a wooden skewer through both boxes as a central support, which stopped the whole tower from wobbling in the wind. Our first version without the skewer leaned like the Tower of Pisa by evening and had to be rebuilt. Each level got its own perch hole, and we filled the top with sunflower seeds and the bottom with a cheaper mixed seed to see if different birds preferred different floors. The blue tits went top, the sparrows went bottom, and my nephew kept a tally chart on the fridge for a week.
4. Cereal Box Tube Bird Feeder
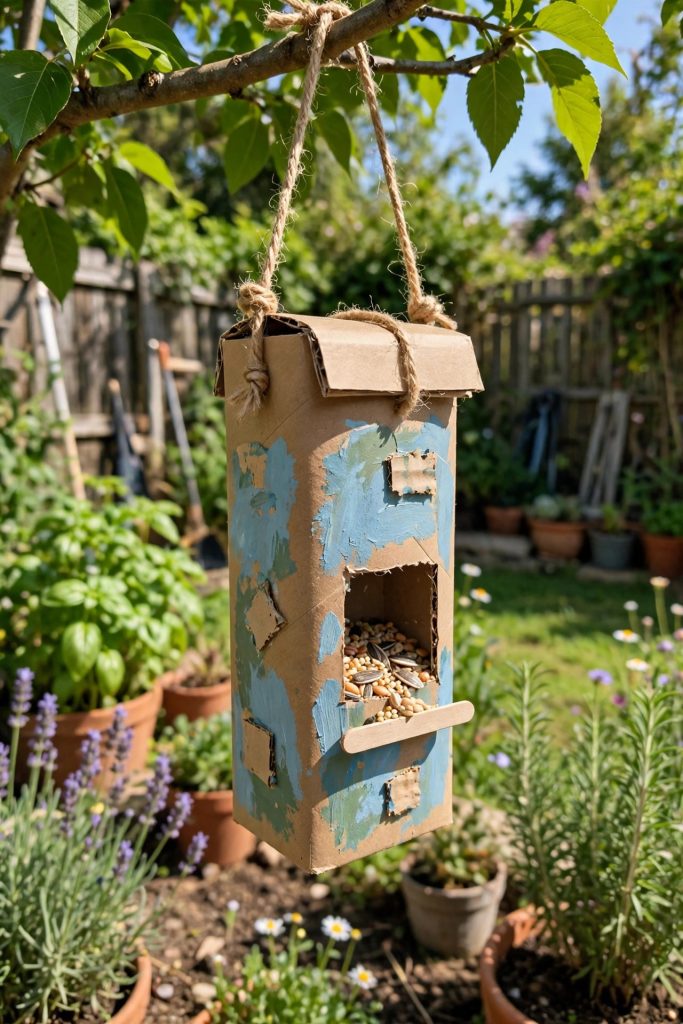
Flatten a cereal box, roll it into a tube, tape the seam, cut feeding holes along the sides, poke wooden skewers through as perches, hang it up — this one felt like a magic trick to my nephew, turning a flat box into a round feeder. The tube shape means birds can feed from every side at once, and we watched three blue tits use it simultaneously, which never happened with the flat-front designs. The failure we had to fix: seed poured straight out of the open bottom the moment we hung it. We folded the bottom flaps in and taped them shut before filling, which sounds obvious now but cost us half a bag of seed to learn. We also wrapped the whole tube in clear contact paper afterwards — about 3 EUR for a roll at the drugstore — and it survived the rest of the autumn without going soggy, while the unwrapped ones lasted maybe three weeks.
5. Platform Cereal Box Bird Feeder

Not every feeder needs to hang, so we made a platform version for the balcony table: cut the top flaps off a box, fold the sides down slightly to make a shallow tray, fill with seed, done. This became the observation feeder — my nephew sat inside with his hot chocolate and watched birds land two metres away, close enough to see individual feathers. The problem we hit was wind: the first gust scattered seed across the entire balcony and my nephew had to sweep it up as punishment, which he considered deeply unfair. We rebuilt it with the sides folded up about four centimetres instead of down, creating a rim that kept the seed in, and we wedged the box between two plant pots so it couldn’t slide. Pigeons found this one within a day and ate like they were at a buffet, so if you want small birds only, the hanging designs with small holes work better.
6. Cereal Box Feeder with Window Cutouts

This is the one that looks most like a real birdhouse: cut a neat round or square window in the front of the box, smaller windows on the sides, and glue a popsicle stick underneath the main window as a little perch. My nephew drew curtains around the windows with markers before we cut them, which was adorable and also gave him cutting lines to follow. The craft knife work is strictly an adult job — cereal box cardboard is tougher than it looks and the knife slipped on me twice, so I did all the window cutting while he held the box steady and supervised. We learned to cut the main window no bigger than six centimetres across; our first one was huge, rain blew straight in, and the seed turned into porridge within two days. The smaller window stayed dry, the popsicle-stick perch held up for the whole season, and this feeder got the most repeat visitors of any we made.
7. Cereal Box Feeder with Compartments

My nephew’s favourite, because it turned bird feeding into a science experiment: we cut strips of cardboard and glued them inside a box to make three compartments, then filled each with a different seed — sunflower seeds, mixed wild bird seed, and crushed oats. Every morning he checked which compartment was emptiest and recorded it in a notebook like a tiny researcher. The sunflower seeds won by a landslide, the oats were ignored for a full week until a particularly brave sparrow tried them, and he still brings this up. Building the dividers taught him to measure properly, because the first set was cut by eye, didn’t fit, and had to be redone with a ruler. We glued the dividers in with a hot glue gun — my job, not his — and let it cure overnight before adding seed, because the one divider we rushed collapsed under the seed’s weight by morning.
8. Cereal Box Feeder with Painted Designs

On the rainiest day we skipped engineering entirely and just painted: my nephew turned a plain feeder box into what he described as “a racing car for birds,” complete with flames and a number seven, using non-toxic acrylic paints from a 6 EUR set. The painting took longer than building all the other feeders combined, and he was completely absorbed, which tells you everything about where the real fun is for an eight-year-old. Two practical things I learned: paint the box before cutting the holes, because it’s much easier to paint a flat surface, and let the paint dry fully — a full 24 hours — before hanging it outside. We rushed one and the morning dew smeared the whole design into a brown blur, which caused genuine tears. A coat of clear waterproof varnish over the finished painting (I used a water-based one, about 5 EUR) kept the artwork bright for months.
9. Cereal Box Hanging Tube with Multiple Holes

This is the group-project version and the one I’d recommend for a classroom or a birthday party: a long tube feeder with feeding holes punched all around it, where each child decorates their own section. We made ours when my nephew’s friend came over on Saturday — each boy got half the tube to paint, and the competition over whose side looked better was fierce and hilarious. We punched six holes total, three per side, each about three centimetres wide, with a skewer perch under each one. The trick with multiple holes is spacing: our first attempt had them too close together and seed poured out faster than the birds could eat it, emptying the tube in a day. Holes at least eight centimetres apart, each with its own little perch, and the seed lasts a week. Two kids, one tube, zero boredom for an entire afternoon.
10. Mini Birdhouse Style Cereal Box Feeder

We saved the prettiest one for last: a mini birdhouse with a peaked roof, open sides, and painted shutters, the full storybook cottage. My nephew was very particular about this one — the roof had to be straight, the door had to be round, the shutters had to match — and it took us most of Sunday. The structural lesson from this build: reinforce the bottom. A birdhouse feeder holds more seed than the flat designs, and our first version bowed in the middle under the weight until we glued a second layer of cardboard across the base. We cut the sides open rather than just punching holes, which makes it easy to refill and gives birds a proper landing edge, and we hung it from the strongest branch we could reach with the string doubled for safety. It survived the winter on the balcony, and my nephew still points it out to visitors like a landlord showing off a property.
Conclusion
Four rainy days, ten cereal boxes, one bag of birdseed, and my nephew went home telling everyone he was “basically an engineer now.” If you’re stuck inside with kids and a recycling pile, start with the classic hanging feeder — fifteen minutes, zero cost, instant birds. The rest is just showing off.