10 Fun Colorful Full-Face Makeup Ideas
I bought my first loud eyeshadow palette on a grey February afternoon in Munich, mostly because the dm shelf looked brighter than the sky outside. It was a nine euro palette with twelve pans, and I took it home to my flat in Schwabing and painted one eye blue and green just to see what would happen. These ten looks all come from that same habit of mine, trying a palette at the kitchen table first, then wearing the result out to a birthday, a festival, or a photo afternoon with friends.
Before You Pick Up a Brush: Three Things I Learned the Messy Way
- Prime the lid first: A pea-sized dab of eyeshadow primer, or a thin layer of concealer set with powder, keeps bright shades from sliding into the crease within an hour.
- Test one colour at a time: Paint a single stripe of each new shade on the back of your hand before it goes near your eyes, so you learn how it blends and how strong it is while it is still easy to wipe off.
- Keep one feature quiet: When the eyes carry five colours, the lips can stay soft, and when the lips go bold, the eyes can stay simple, which stops the whole face from shouting at once.

1. Rainbow Eyes with Coordinated Lips

I first tried a full rainbow eye for a friend’s garden party in June, and I did it the slow way, one colour at a time, because I had seen too many photos where the shades turned into one muddy stripe across the lid. I started with a warm red at the outer corner, then orange, yellow, green, blue, and a soft purple near the inner corner, blending each edge with a clean fluffy brush before the next colour went on, and I never rushed a blend. What saved me was working with a light hand and building the pigment in two thin layers instead of one heavy swipe, which kept each shade readable on its own. For the lips I picked a coral pink that matched the orange in the eye, because matching the lip to one shade in the rainbow ties the face together without adding a seventh colour to the mix. I dabbed a little iridescent highlighter on the cheekbones and the tip of my nose. This one suits a summer party, a pride parade, or a photo shoot in the park, and it photographs well in daylight, which is where the separate colours show up best.
Try this: Blend each rainbow shade with a clean brush before adding the next, and keep the lip in one of the eye colours so the face reads as one planned look. This fits a summer garden party, a festival afternoon, or a bright photo shoot outdoors.
2. Neon Pop Full Face

Neon makeup scared me for a long time because I assumed it would look like a highlighter pen had exploded on my face, and then I tried it for a club night in Munich and learned that the secret is placement, not restraint. I kept the base simple, a light foundation and a little powder, then put electric pink on the lid, a line of lime green along the lower lash line, and a neon orange lip that I blotted once so it stayed bright without bleeding past the lip line. The eyeshadow went on over a white base, a trick I picked up from a makeup artist on YouTube, and the white underneath made the pink look twice as strong with half the product. Blush in a matching neon tone sounds odd, but a light wash of the same pink across the cheeks pulled the whole face together, and I skipped heavy contour because neon and sharp contour lines fight each other. Under normal light the look reads bold and cheerful, and under the blacklight at the club the pink and green glowed. Pair it with blue nail ideas in a matching shade and the hands echo the face without stealing attention from it.
Good to know: A white base under neon shadow doubles the colour payoff, and an oil cleanser takes neon pigment off without leaving a stain. This fits a club night, a UV party, or a bold editorial photo session.
3. Monochromatic Bold Color

My favourite version of this look is an all-pink face, and I first wore it to a Sunday brunch in Glockenbach, where it got more compliments than any complicated eye look I have ever done. I started with a soft pastel pink across the lid, then a deeper rose blush swept high on the cheekbones, and a fuchsia lipstick that I pressed on with my finger at the centre and blended out toward the edges for a softer finish. The single colour works because the shades change in depth from light to dark, so the face has shape even though the palette stays in one family. I added a touch of gloss on the centre of the lips and a champagne shimmer at the inner corner of the eye. I checked the shades in daylight by the window before I left the flat. I wore it with a plain white shirt and jeans, and the simplicity of the clothes let the pink carry the whole outfit. This one suits a daytime event, a lunch with friends, or a date where you want to look polished without looking overdone, and it works in any single colour you love, from plum to peach to a deep berry.
Make it yours: Pick your favourite colour family and use three depths of it, light on the lid, medium on the cheeks, dark on the lips. This fits a daytime brunch, a lunch date, or any occasion where you want one strong colour to carry the look.
4. Sunset-Inspired Palette

I built this look one August evening after watching the sky over the Isar turn orange and pink, and I went home and tried to copy those exact colours onto my face. I started with a deep purple at the outer corner of the eye, blended it into a warm orange across the middle of the lid, and finished with a soft peach near the inner corner. The blush was a warm coral swept across the apples of my cheeks and a little up toward the temples, and the lips were a dusty rose that sat between the pink and the orange without competing with either. The blending took me longer than any other look here, maybe fifteen minutes just on the eyes, because a sunset gradient only works when you cannot see where one colour stops and the next starts. I wore this to a rooftop dinner in late summer, and in the low evening light the gold shimmer did most of the work for me. This one fits an evening event, a summer dinner outside, or a holiday photo on the beach, and it is the look I reach for when I want colour that still feels warm and grown up.
Budget tip: One warm palette and a four euro liquid highlighter cover this whole look, and a clean brush does the blending work no extra product can replace. This fits a summer evening dinner, a rooftop party, or a golden hour photo session.
5. Pastel Fantasy Makeup

Pastel makeup is the quietest look in this list, and that is why I like it for spring, when I want colour without the noise of a neon or a rainbow. I first wore it to a friend’s baby shower in April, and I used lavender on the lid, a wash of mint along the lower lash line, and a baby blue pressed into the inner corner. Pastels need a pale base to show up at all, so I put a white primer on the lid first and packed the shadow on with a flat brush instead of sweeping it, which keeps the soft colour from disappearing into the skin. Blush was a soft peach, barely there, and the lips were a pale pink gloss that I reapplied twice during the afternoon because pastel gloss fades faster than a lipstick. I wore my hair in a loose braid and a light floral dress, and the softness of the makeup matched the softness of the outfit in a way that felt planned without feeling stiff. Pastel shades suit a spring garden party, a bridal shower, or a daytime photo shoot, and they work well on fair skin in particular. Pair the soft colours with sassy haircuts for older women in a short, neat style and the whole look stays fresh and light.
Beginner tip: Pack pastel shadow on with a flat brush over a white primer, and build it in two layers, because one sweep of pastel barely shows. This fits a spring garden party, a baby shower, or a soft daytime photo shoot.
6. Glitter Explosion Face

I wore a full glitter face to a New Year’s Eve party two years ago, and I learned two things that night: glitter gets everywhere, and nobody at a party minds that at all. I started with a dark metallic shadow on the lid, then pressed loose silver glitter over the top with a flat brush and a dab of glitter glue, which is the one product I would never skip for this look, because loose glitter without glue ends up on your collar and your coat within the hour. I put a little more glitter on the cheekbones and a dusting across the brow bone, and I finished the lips with a clear gloss and a pinch of fine gold glitter pressed into the centre. Taking it off took patience, and I used tape to lift the loose pieces first, then an oil cleanser, then a normal wash, which kept glitter out of my eyes and off my pillow. I kept my hair in a high ponytail so nothing brushed against the glitter on my cheeks. This one suits New Year’s Eve, a birthday party, a festival, or any night where you want to be the brightest thing in the room, and it is worth doing the removal properly the same night rather than finding glitter on your face the next morning.
Where it works: Glitter glue holds loose glitter on the lid for hours, and tape lifts the loose pieces off at the end of the night. This fits New Year’s Eve, a birthday party, or a festival night where sparkle is the whole point.
7. Color-Blocking Face Art

Color-blocking is the most graphic look in this list, and I first tried it for a creative photo afternoon with a friend who shoots portraits, because it is a look that only makes sense when someone is holding a camera. I painted a block of cobalt blue across the lid with a sharp edge, a block of neon pink high on the cheek, and a flat orange lip, leaving the rest of the face bare and powdered so the three blocks of colour stood out. The clean edges are the whole point, so I used a piece of tape along the outer corner of the eye as a guide, and I cleaned up the cheek block with a cotton bud dipped in micellar water before the colour had time to set. I wore my hair slicked back so the blocks of colour had a clean frame. In person it is a lot of look, and I would not wear it to the supermarket, but for a shoot, an art event, or a themed party it turns heads in the best way. The key is confidence in the edges: a wobbly border makes it look like a mistake, while a sharp border makes it look like a choice. This one suits a portrait shoot, an art opening, or a fancy dress night where the makeup is part of the costume.
Watch out: Tape along the outer eye corner gives you a sharp edge, and a cotton bud with micellar water cleans a wobbly border before the colour sets. This fits a portrait shoot, an art event, or a themed party where the makeup is meant to be seen.
8. Ombre and Gradient Effects

An ombre lip was the first gradient I ever learned, and I still think it is the kindest way into colour, because it looks impressive and takes about three minutes. I start with a darker shade at the outer edges of the lips, a plum or a deep rose, then press a lighter pink into the centre with my finger and blend where the two meet until there is no line left between them. The same idea works on the eyes, where I blend a teal at the outer corner into a soft lilac toward the inner corner. I wore a pink-to-coral ombre lip to a wedding in the summer, and it lasted through the ceremony, the dinner, and the dancing, because I had layered a lip liner underneath in the darker shade and blotted the lipstick twice before leaving the flat. If the gradient looks patchy, the fix is usually more blending rather than more product, and a lip balm underneath keeps the centre shade from cracking. I paired it with elegant outfit ideas in a simple summer dress, and the soft fade of the makeup matched the easy mood of the day. This one suits a wedding guest, a summer dinner, or any occasion where you want colour that reads as polished rather than loud.
Try this: Blend a darker lip shade at the edges into a lighter one at the centre with your finger, and use a clean brush to soften every border. This fits a summer wedding, a dinner out, or any occasion where soft colour suits the mood.
9. Neon Liner Accents

Neon liner is my answer for nights when I want colour but I do not want a full face of it, and I first wore it to a concert in Munich where I knew the lighting would be low and a bright line around the eyes would still read from a distance. I drew a floating line of electric blue just above the crease, with a small wing flicked out at the end, and I kept the rest of the face soft, a nude shadow, a light peach blush, and a lip balm with a hint of pink. The liner went on in one smooth stroke because I rested my elbow on the table and drew from the outer corner inward. I kept the single blue line for a normal night out, which is enough on its own. It came off easily with micellar water, which is a pleasant change from glitter. I wore my hair down and a plain dark top, and the liner was the one bright detail in the whole outfit, which is why it worked. This is also a good look for someone who is new to colour, because one line is a small step and you can wipe it off and start again in seconds if it goes wrong. It suits a concert, a night out with friends, or a party where you want one bold detail rather than a full face of colour.
Good to know: Rest your elbow on the table and draw the liner from the outer corner inward, and keep the rest of the face soft so the neon line stays the star. This fits a concert, a night out, or any evening where one bright detail is enough.
10. Rainbow Glitter and Gems
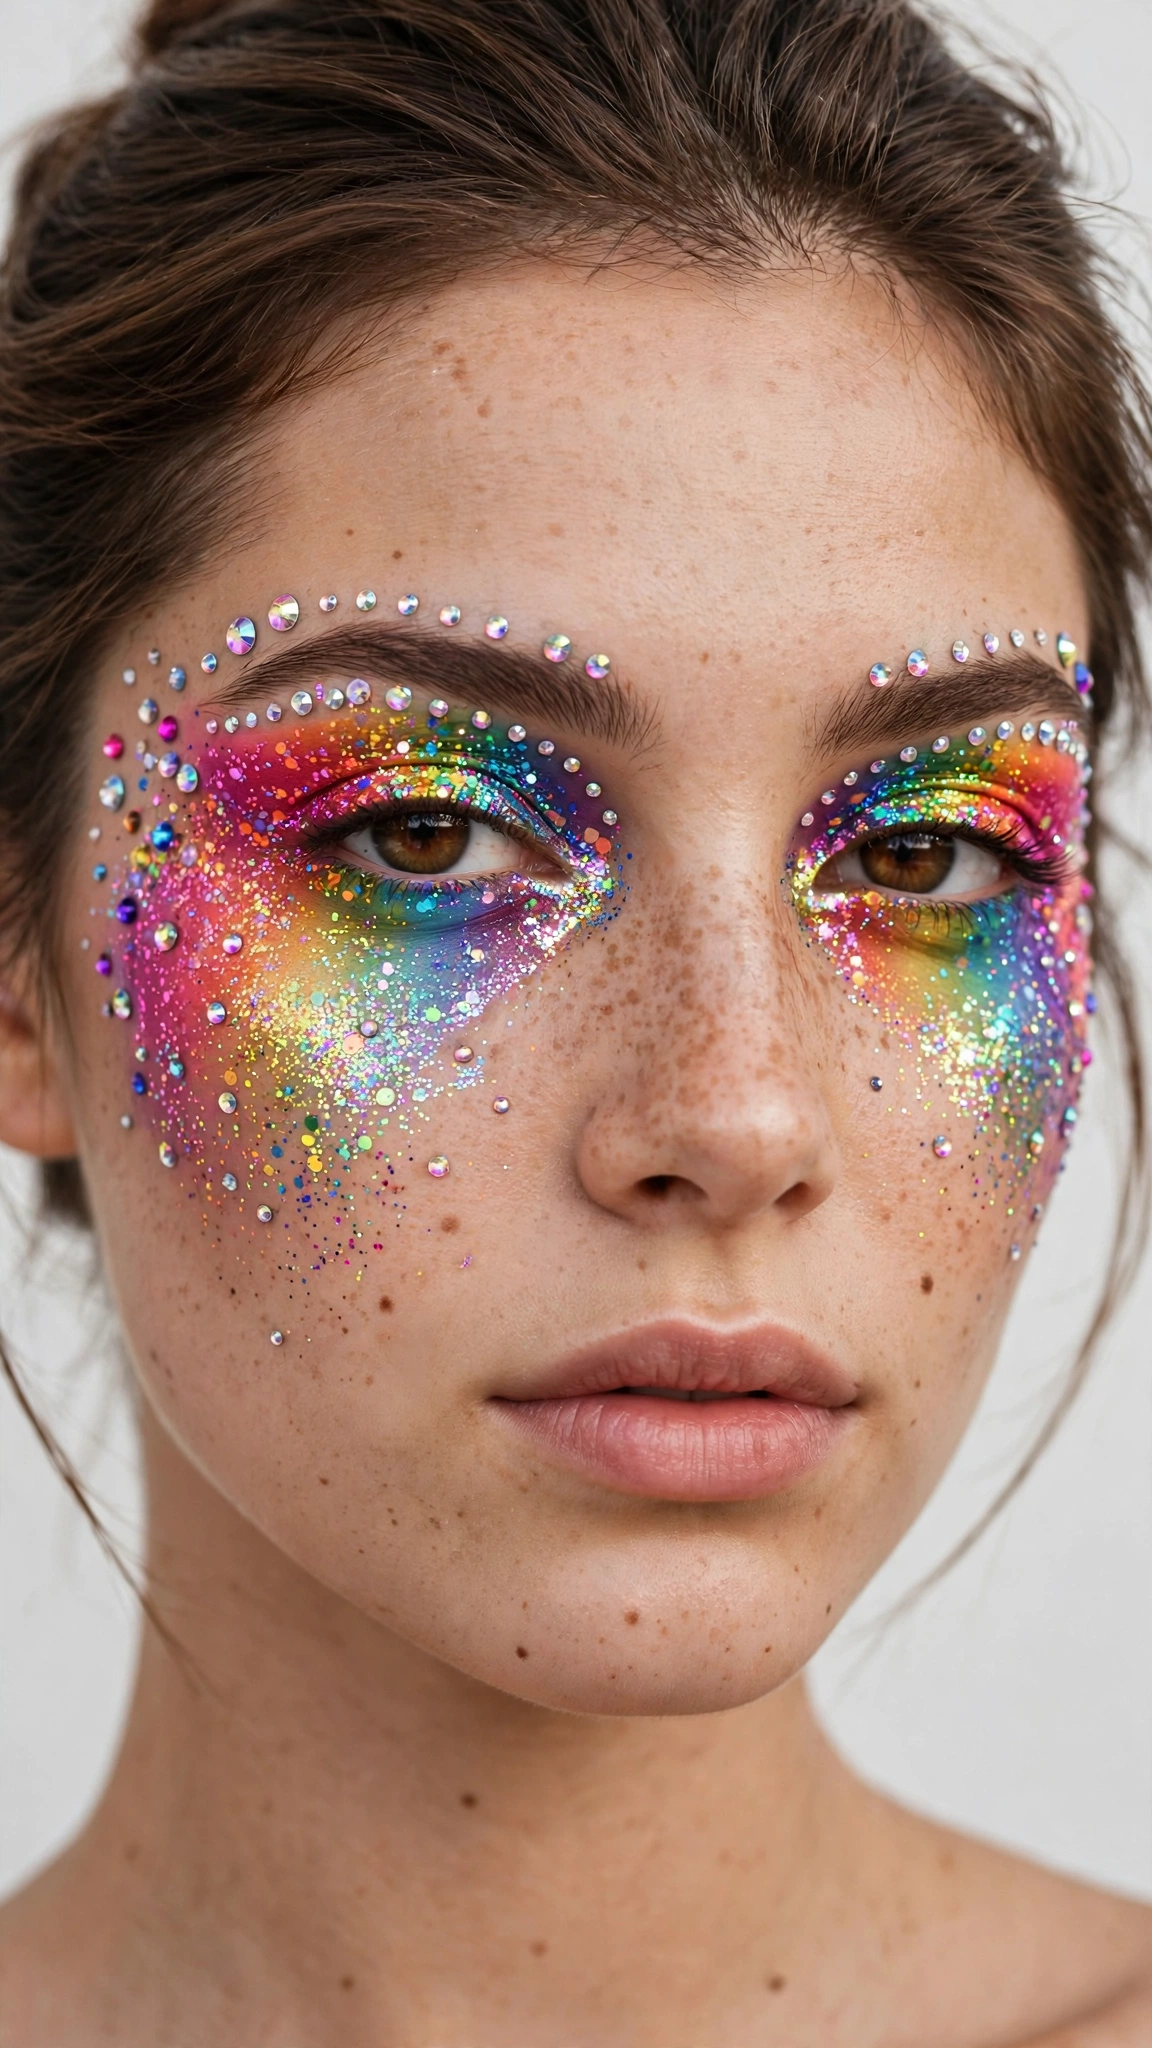
This is the boldest look in the whole list, and I saved it for a festival weekend in the summer, when going over the top is not just allowed but expected. I started with the rainbow eye from the first idea, the same six shades blended across the lid, then pressed fine gold glitter over the centre of the lid and stuck small rhinestones along the brow bone and at the outer corners, using a dot of lash glue on the back of each stone. The gems were a sheet of self-adhesive rhinestones from a craft shop for three euro, and they stayed on all afternoon, though I did lose one on the dance floor. The removal took the longest of any look here, because I had to peel each gem off gently, then use tape for the loose glitter, then oil cleanser, then a wash. I wore a denim jacket and my hair in two braids, and the whole outfit felt like a festival costume that I had built around the makeup rather than the other way round. This one suits a festival, a stage performance, a carnival party, or a birthday where the theme is more is more, and it is the look I would pick for any day when the plan is to be photographed a lot. It is not an everyday look, and I would never claim otherwise, but for one bright afternoon it is pure fun.
Make it yours: Stick rhinestones along the brow bone with a dot of lash glue, and keep the lip in one rainbow shade so the sparkle stays tied together. This fits a summer festival, a stage performance, or a carnival party where going big is the whole point.
Conclusion
Colour on the face is a habit I picked up at my kitchen table in Munich, and it has stayed with me because it turns an ordinary morning into a small creative project. I keep my palettes in a drawer by the window now, and I still test a new shade on the back of my hand before it goes anywhere near my eyes. Pick one look from this list, give yourself a free afternoon, and see which colour makes you smile when you catch your own eye in the mirror.