10 Cheap Wall Covering Ideas
Our hallway wall stared back at me for two years. It was not ugly, exactly. It was just blank, the kind of blank that makes a whole room feel unfinished. I got a quote for proper wood paneling once and quietly closed the tab. Then I started trying the cheap routes instead, one wall at a time, and most of them turned out better than the expensive version would have.
Cheap does not mean flimsy here. Every idea below costs a fraction of a full renovation, and most of them come off cleanly if you change your mind, which matters a lot when you rent or when your taste changes every spring like mine does. Some are peel and stick, some are paint and patience, and one is just a stack of thin boards from the hardware store. All ten are real rooms, from real homes on Instagram, and each one shows what the idea actually looks like once it is up.
Before You Start: 4 Things I Learned the Hard Way
- Order one extra roll or pack. Running out mid wall means a second delivery and a shade that never quite matches.
- Clean the wall first, even if it looks clean. Dust is the reason peel and stick edges curl up a week later.
- Start on the least visible wall. Your first strip is always your worst strip, and nobody needs to see it.
- Live with a sample for two days. Colors change completely between morning light and lamplight.
1. Floral Wallpaper Above Painted Wainscoting
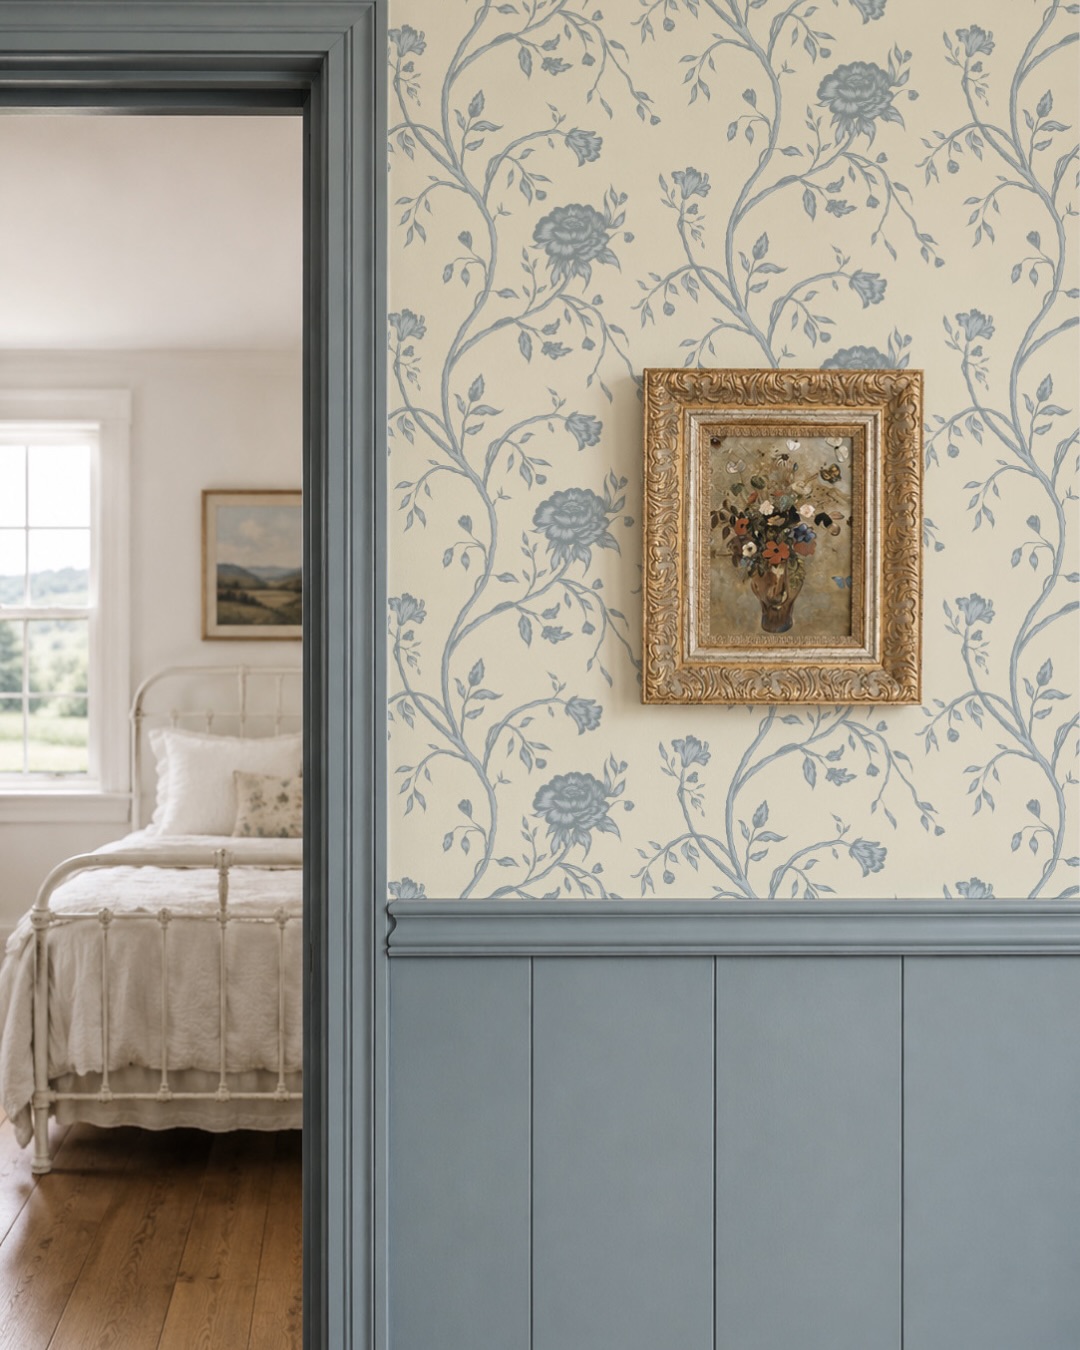
The top half of this wall is a blue floral wallpaper, and the bottom half is painted paneling in a dusty blue grey. It is a classic split, and it works because the two halves share a color. The wallpaper does the talking and the paneling keeps it grounded, so the room feels decorated without feeling busy.
This is a good one to start with if full wallpaper feels like too much. You only need enough paper for the top half, which cuts the cost nearly in half, and the lower half is just paint over boards you can cut yourself. A gold frame or a small mirror sits well on the paper, since the pattern is calm enough to let it stand out.
Try this: paint the paneling first and let it dry fully before you hang a single strip, or the paper edge will pick up paint dust and never sit flat.
2. A Forest Mural That Covers the Whole Wall
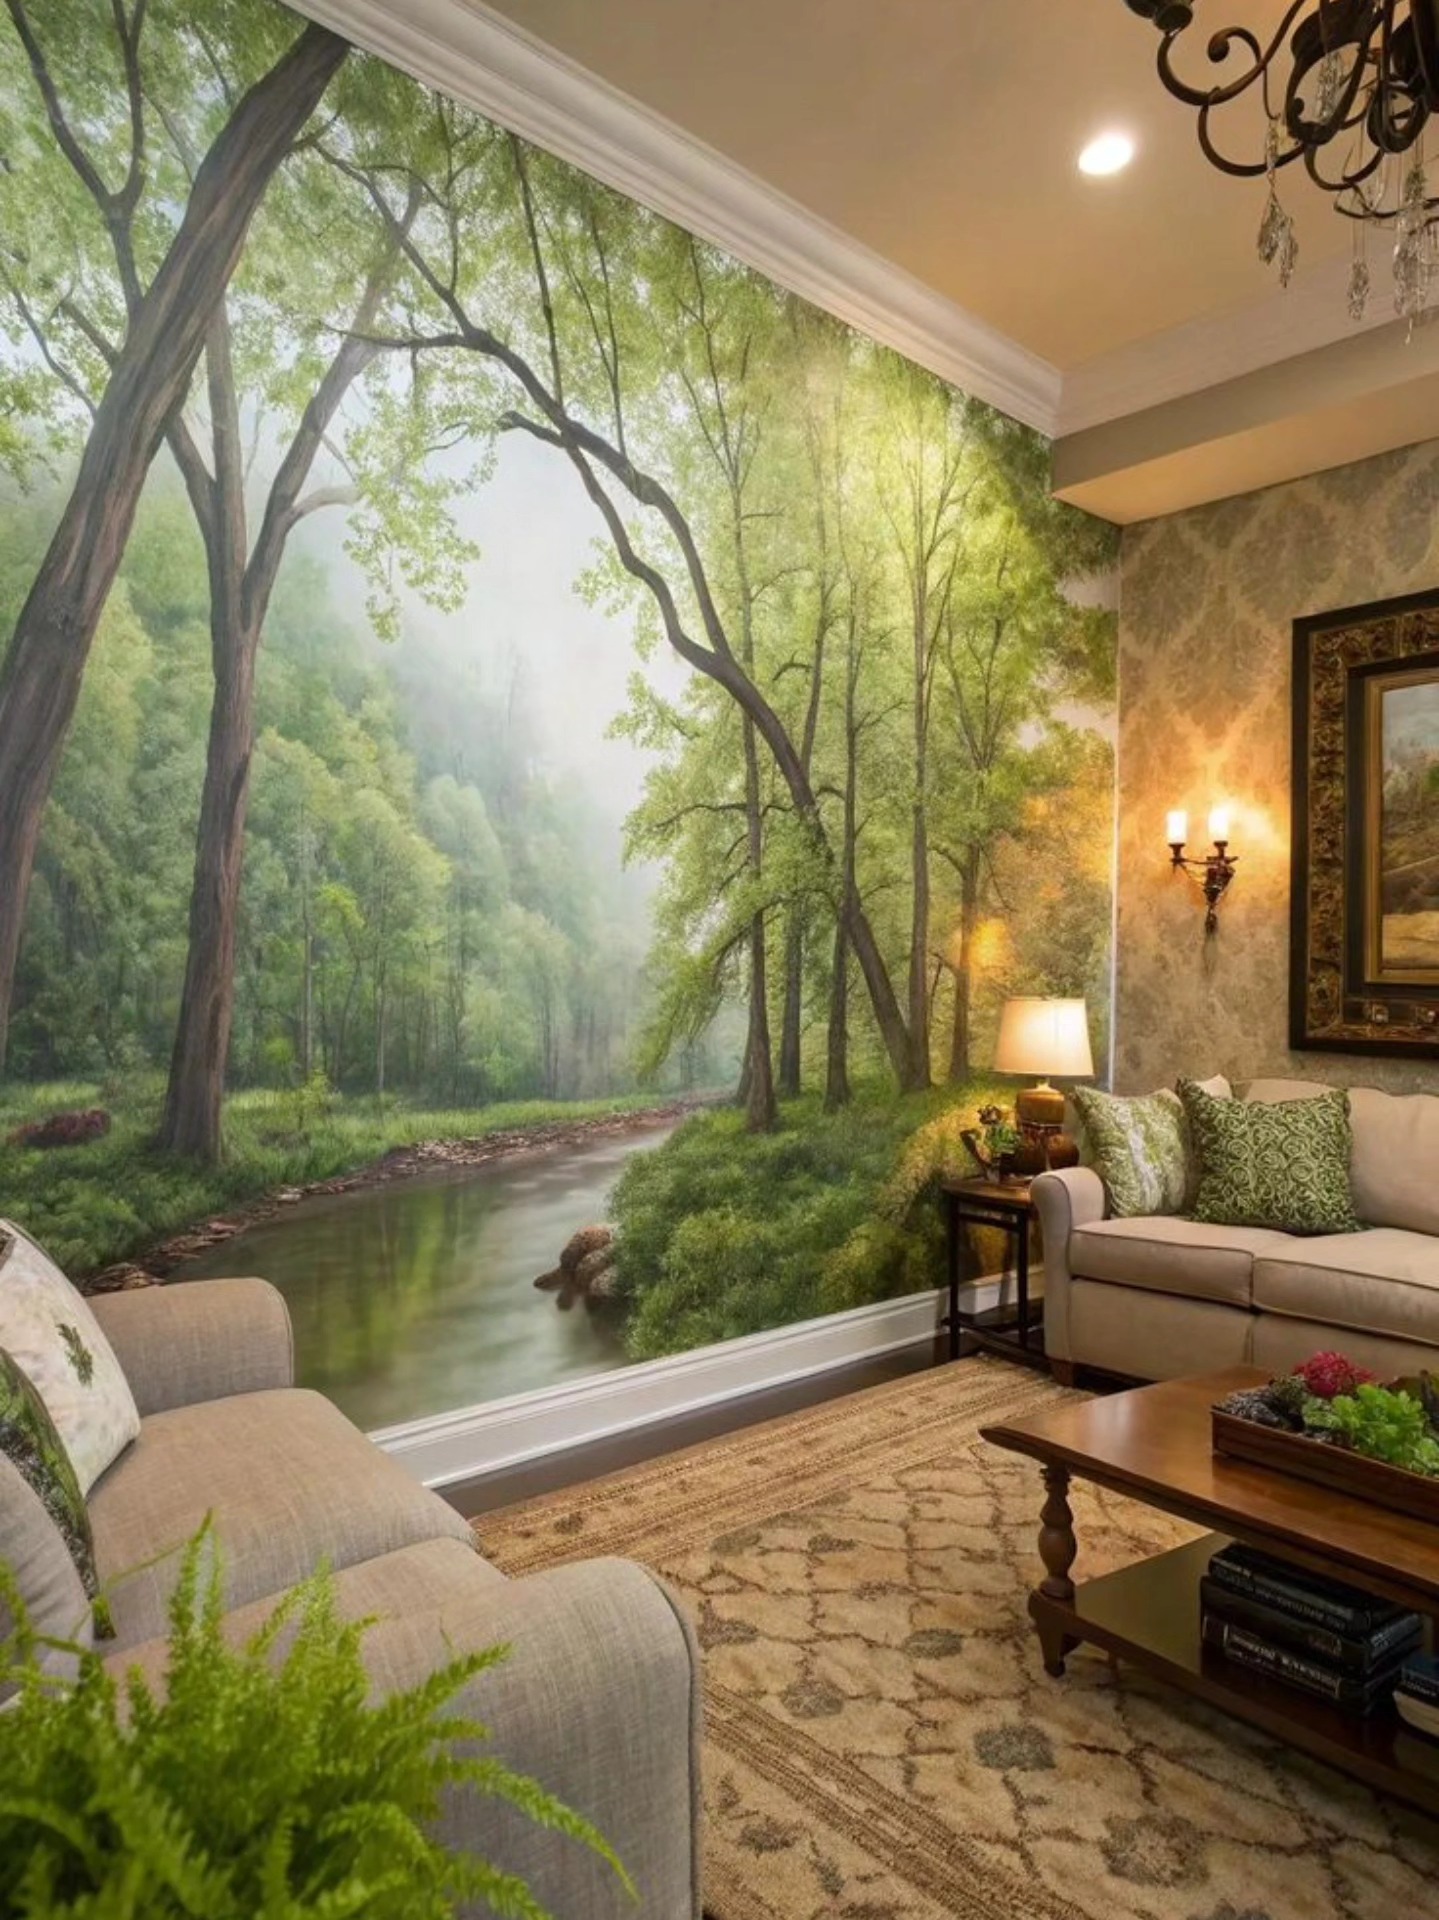
A printed mural is the fastest way I know to change a room in an afternoon. This one turns a plain living room wall into a forest with a river running through it, and the sofas suddenly look like they belong in a lodge. One wall is enough. Two would be too much, and three would feel like a theme park.
Murals like this come as peel and stick panels now, sized to your wall, and they cost far less than real wallpaper in the same size. Measure twice and order the panels numbered, because once they are up in the wrong order you will know it every time you sit down. If the mural makes the rest of the room feel plain, a few soft layers help, and these cozy boho living room ideas pair well with a nature wall.
Good to know: hang murals in daylight. A panel that looks straight under a ceiling light can sit a few millimeters off once the sun hits it.
3. Striped Wallpaper in the Hallway
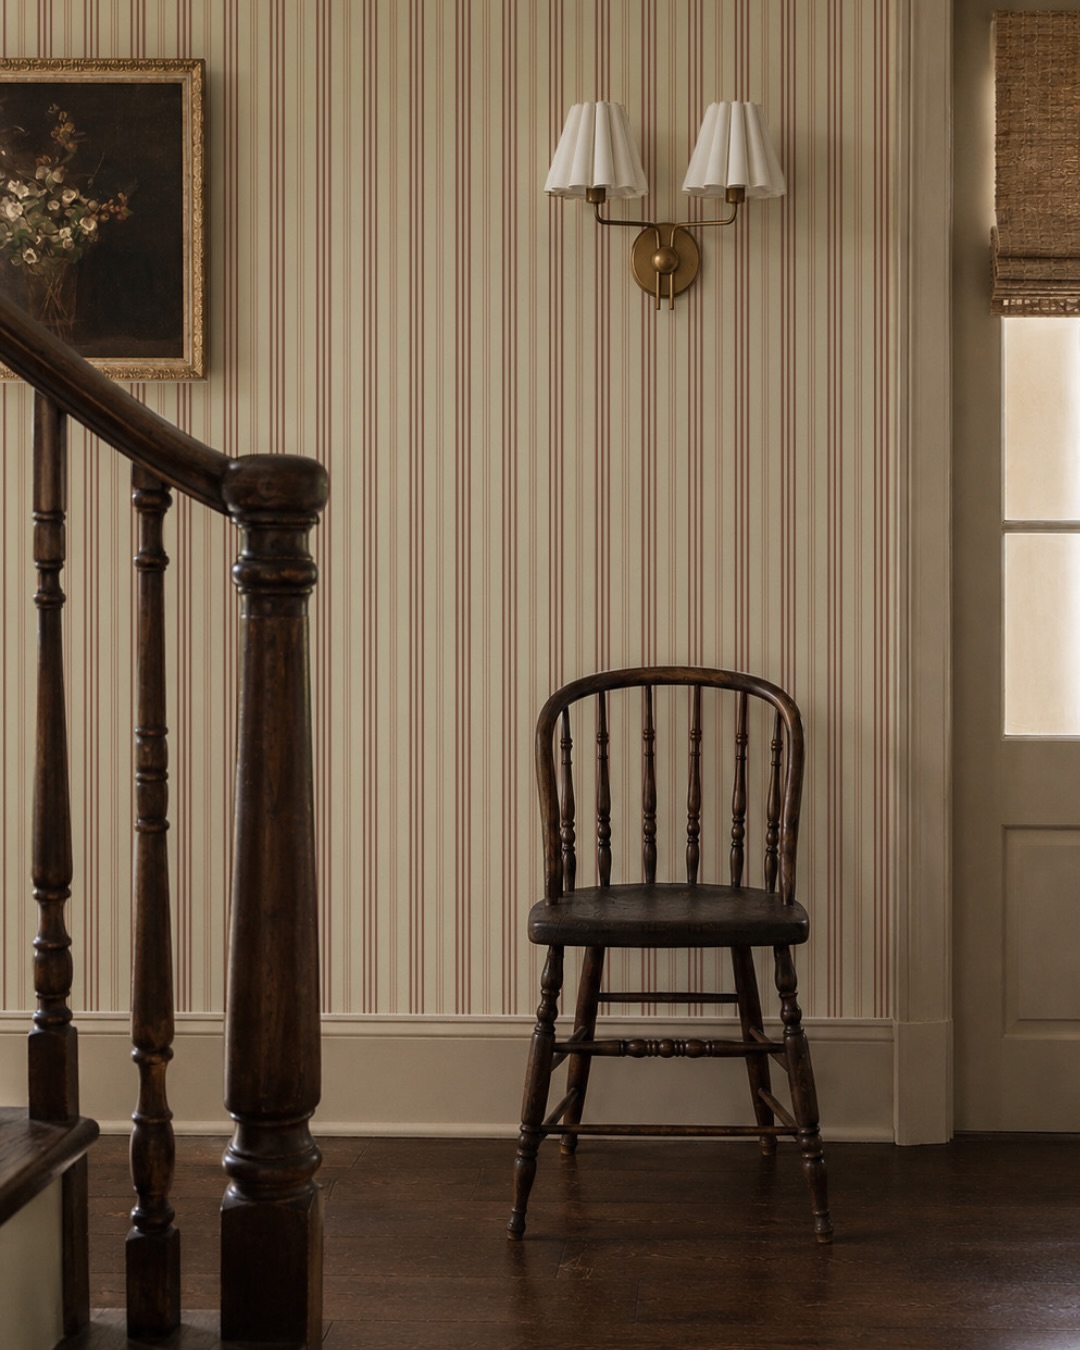
Hallways get ignored because nobody sits in them, but you walk through yours a dozen times a day. Thin red stripes on a cream paper give this one a quiet, old house feeling, and the stripes pull your eye along the wall, which makes a narrow space feel longer instead of tighter.
Stripes are forgiving for a first timer because the pattern hides small mistakes in a way a big floral never will. The trick is lining up the first strip perfectly straight, since every strip after it follows that one. Hallways and stair walls are the same job, really, and these ideas for stairs between two walls show how far a simple treatment goes in a tight space.
Worth trying: use a plumb line, not the door frame, to set your first strip. Old frames are rarely straight.
4. Small Floral Wallpaper Behind the Bed
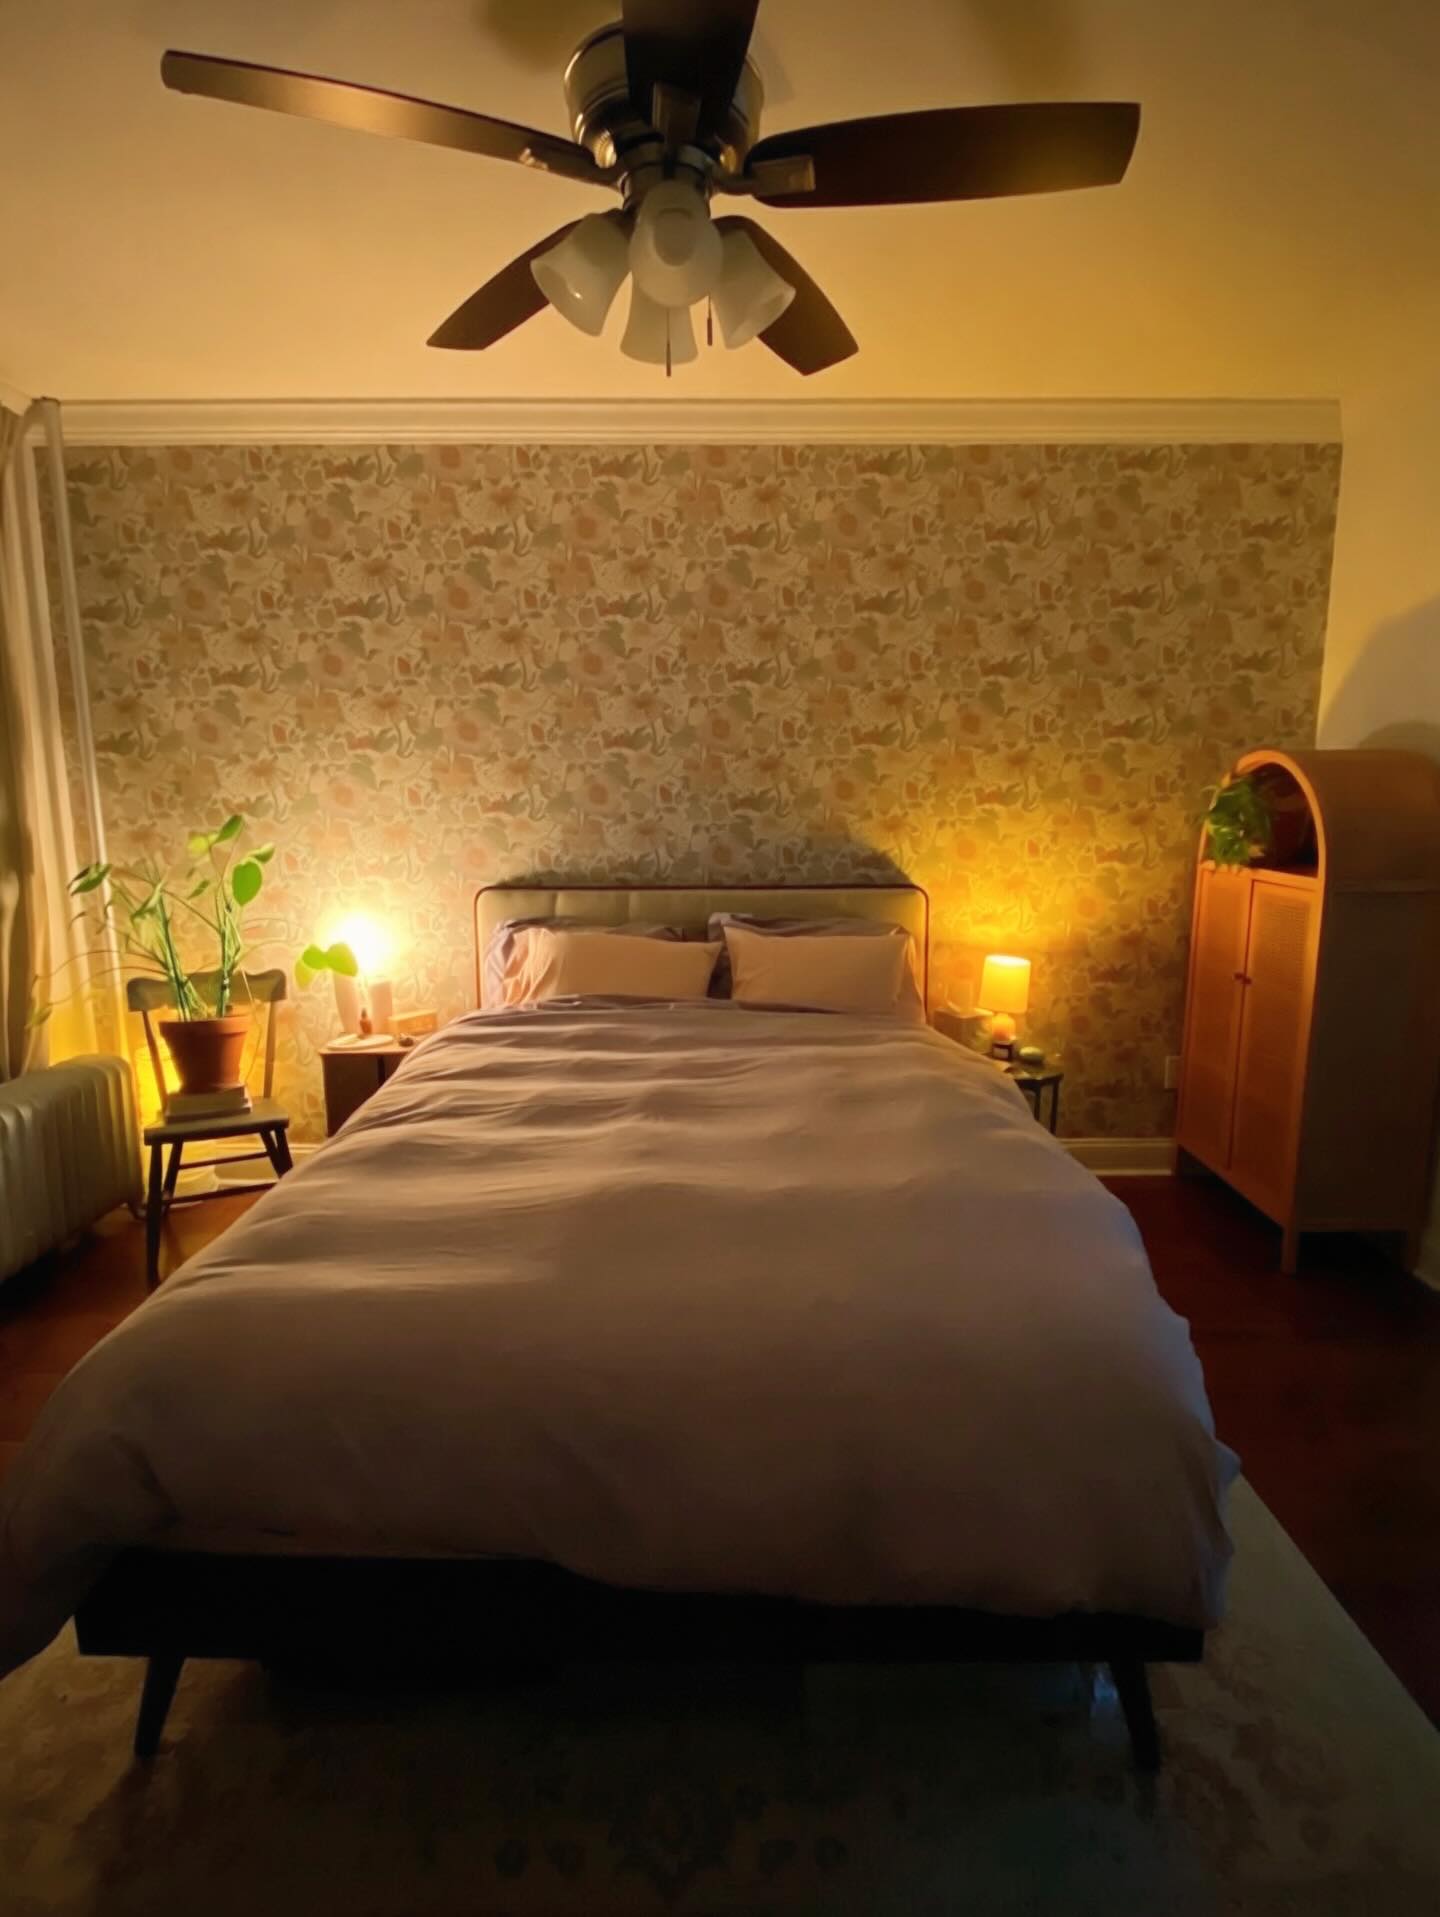
A bedroom only needs one dressed wall, and the one behind the bed is the obvious pick. This small floral print in warm tones does the work of a headboard and art at the same time, and the lamps on either side make the pattern glow a little at night, which is the whole point of a bedroom wall.
One wall of paper is the cheapest way into wallpaper, and it is the easiest to change later too. If you are renting, peel and stick versions of small prints like this one come off without a fight, and a landlord rarely notices the difference between that and paint. Pick a print with a small repeat so you waste less paper matching the pattern.
My pick: warm, muted florals over bright ones in a bedroom. You look at this wall last thing at night, and loud colors keep you awake longer than you think.
5. Dark Wallpaper in the Smallest Room
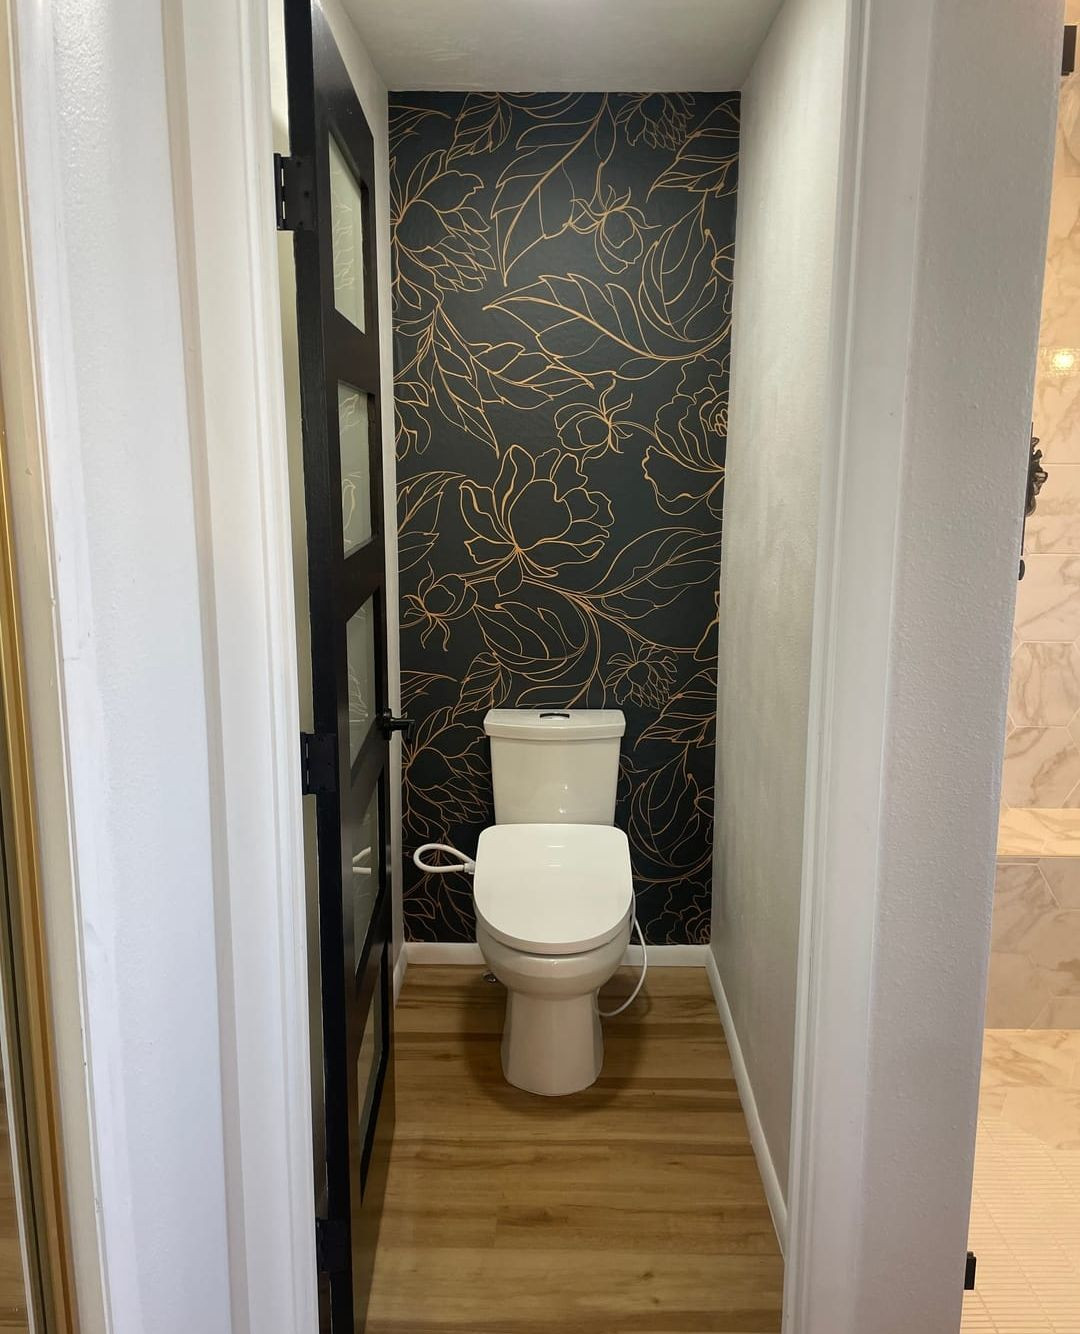
A powder room is the best place in the house to be brave. Nobody spends long in there, the wall is tiny, and a dark green paper with gold line work turns a forgotten corner into the room guests actually mention. This one uses a single accent wall, and the white walls around it keep it from closing in.
Small rooms take about one roll, sometimes two, so the cost stays low even if the paper itself is not the cheapest on the shelf. Dark papers also hide the scuffs and splashes that show up fast in a room this size. Just check the paper can handle steam before you buy it, because a powder room with a shower in the next room gets more damp than you expect.
Keep in mind: dark paper shows every bubble. Smooth it from the center out with a plastic smoother, and go back over the edges an hour later when the paste has settled.
6. Leaf Print Wallpaper at the Vanity
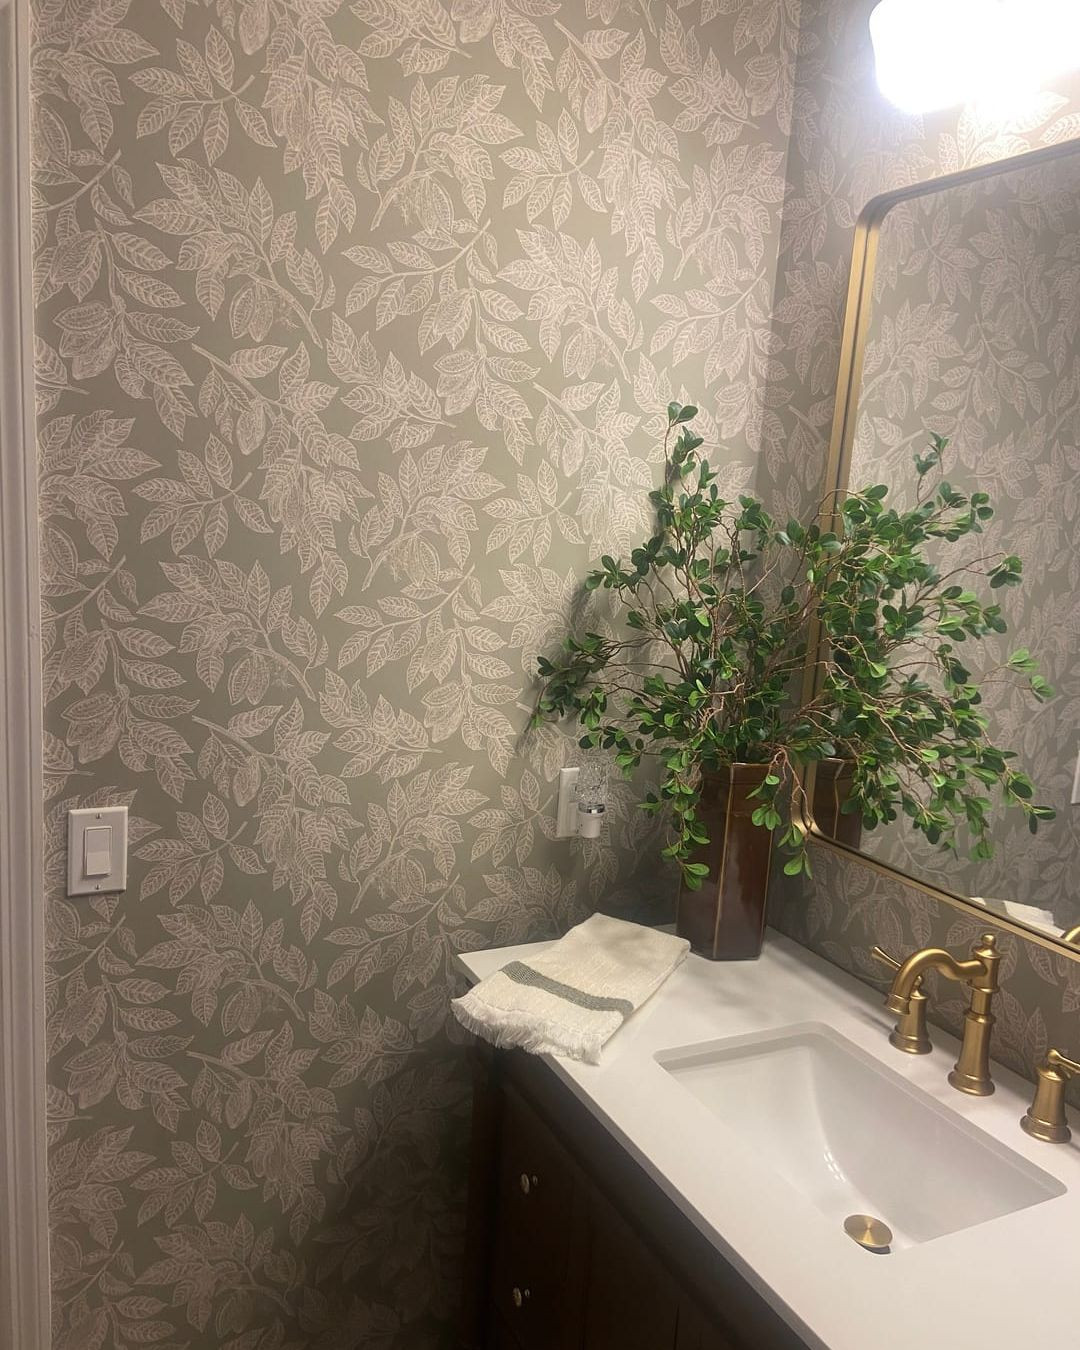
The vanity wall is the one you see in the mirror every morning, so it deserves more than plain paint. A sage leaf print like this one feels calm without being boring, and the brass taps pick up the warmth in the paper. It is a small area, which means a small amount of paper and a Saturday afternoon of work.
Bathrooms scare people off wallpaper, but modern vinyl and peel and stick papers handle steam well as long as the edges are sealed and the room has a fan that actually runs. The same thinking applies in a kitchen, where steam and splashes are part of daily life, and these kitchen wallpaper ideas show which patterns hold up where water is involved.
Small detail: run the paper behind the mirror, not around it. Cutting around a mirror wastes paper and leaves an edge that peels first.
7. A Wood Slat Wall From Cheap Battens
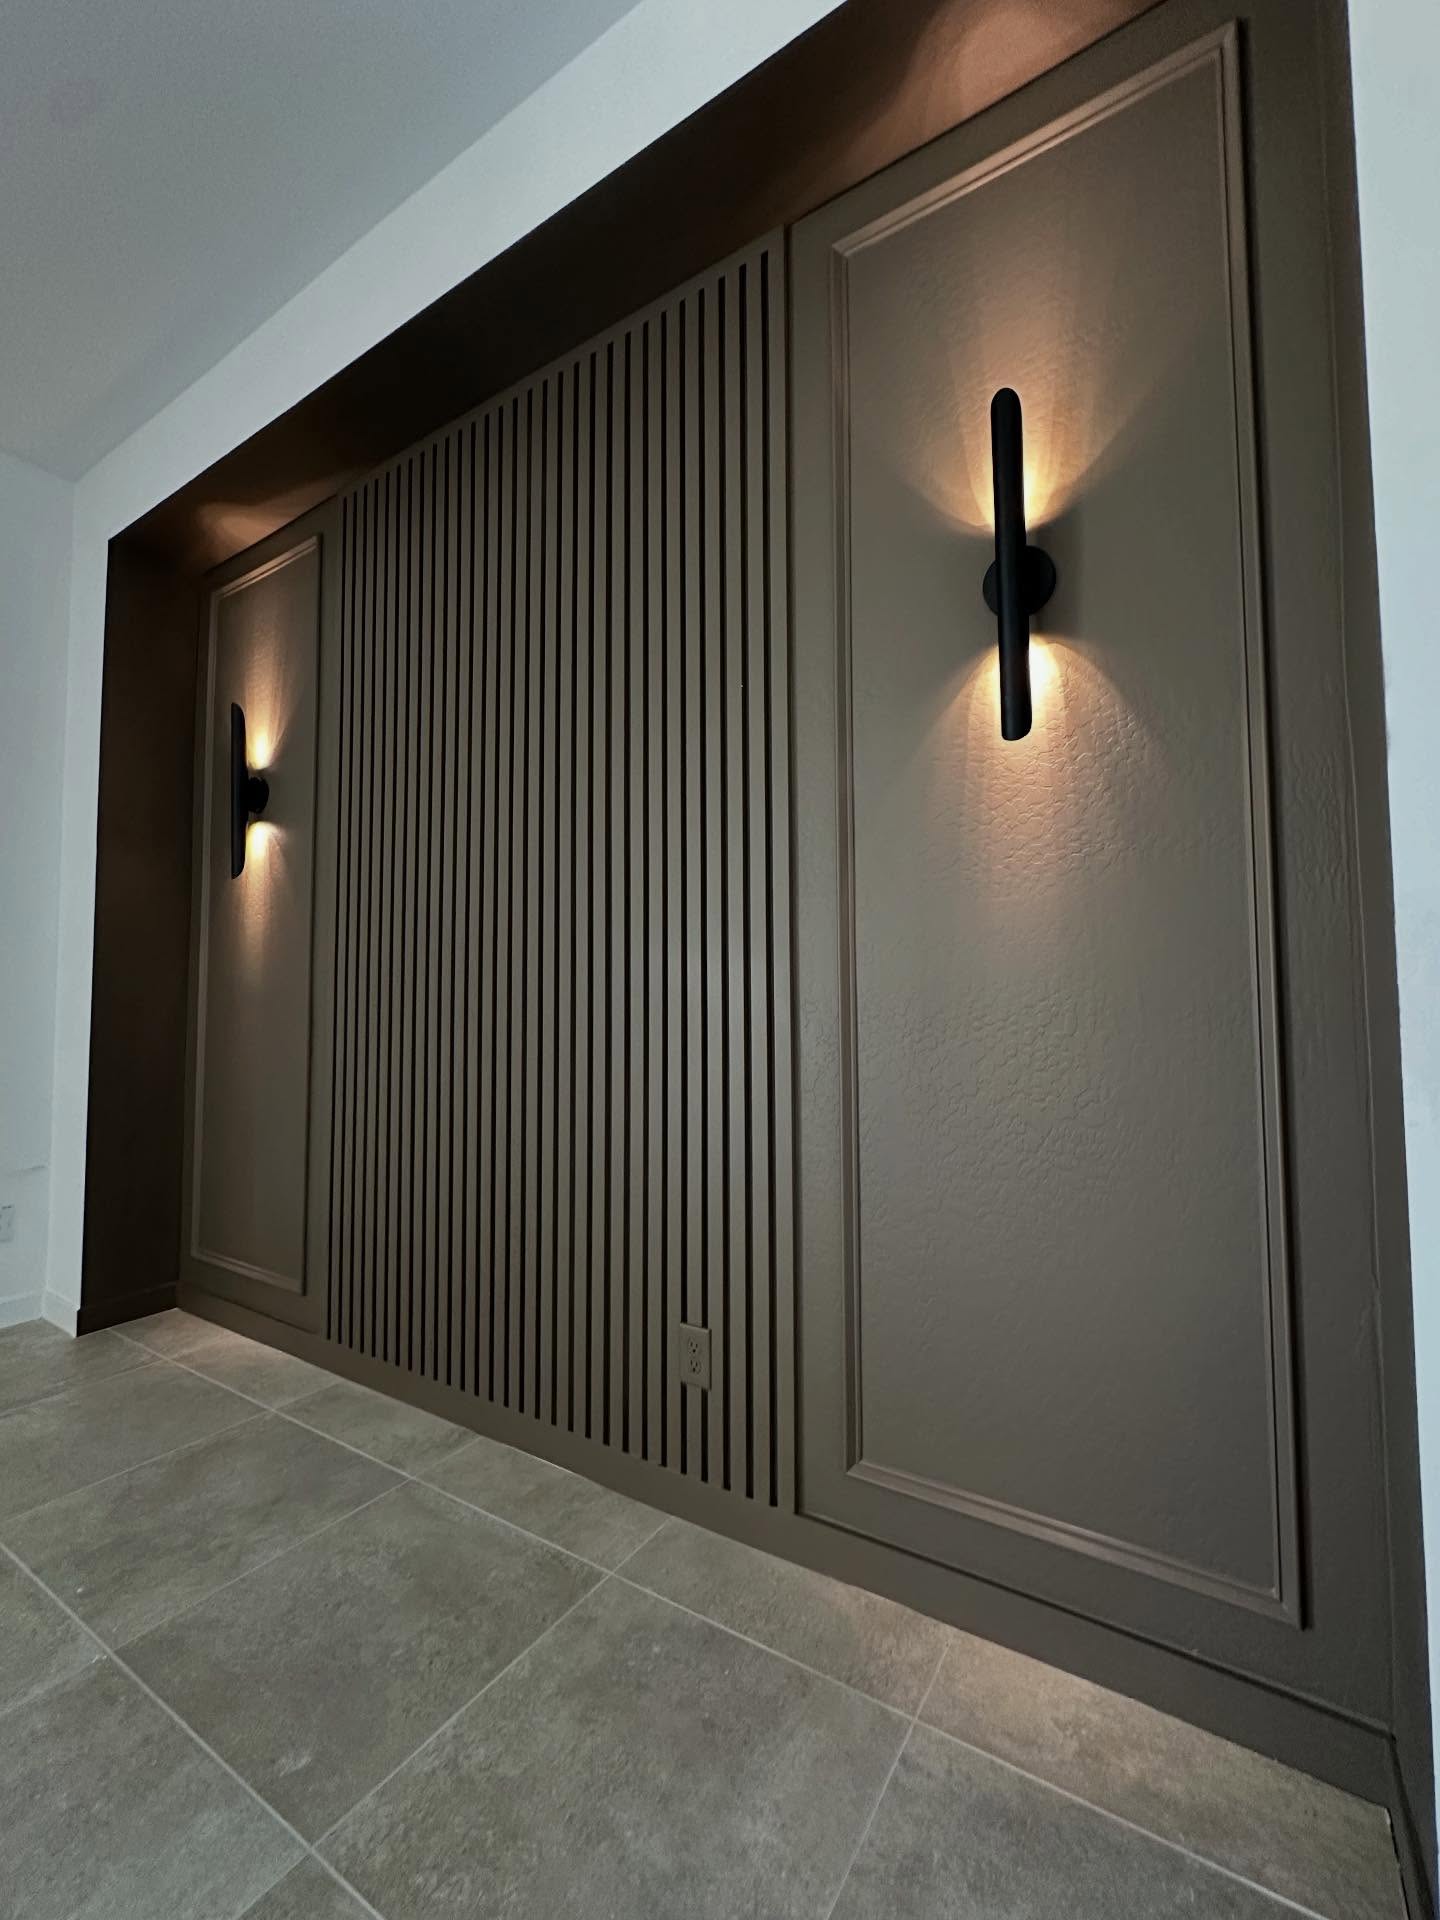
Slat walls look expensive, and the ready made panels are. But thin battens from the hardware store, painted one color and fixed to the wall with even gaps, give you the same lines for a fraction of the price. This one mixes slats with flat framed panels and two slim wall lights, and the whole wall reads like a hotel lobby.
The work is slow rather than hard. Cut the battens to length, paint them before they go up, and use a spacer block so every gap matches. Painted slats in a dark taupe or charcoal hide dust and fingerprints far better than pale wood, which matters in a hallway or behind a sofa.
What worked: painting the wall behind the slats the same dark color first, so the gaps read as shadow instead of white stripes.
8. Limewash for a Soft Plaster Look
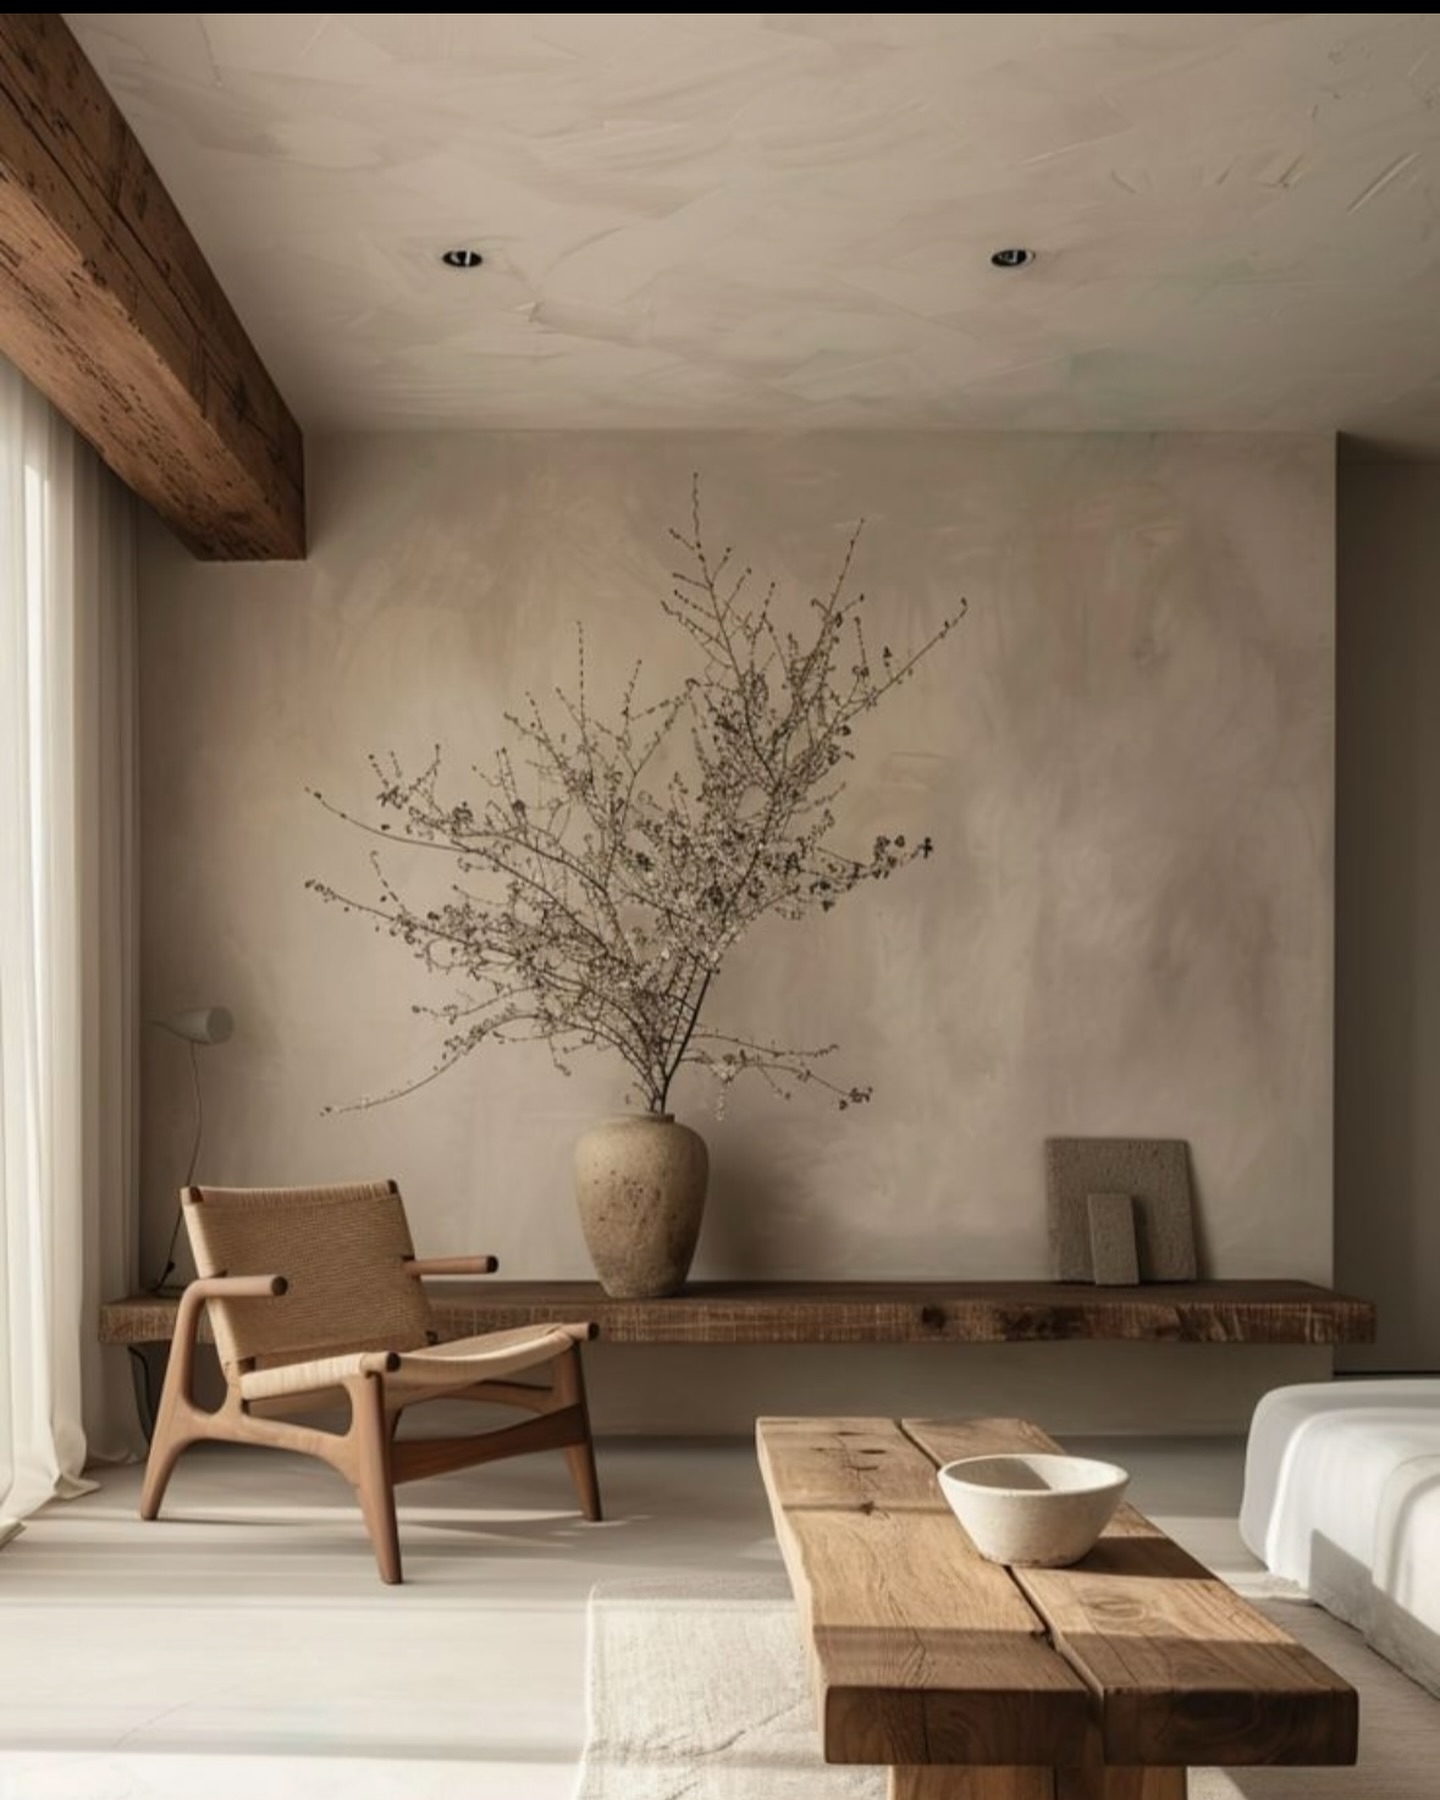
Limewash is just mineral paint brushed on in loose, overlapping strokes, and it dries with the soft cloudy texture you see on old plaster walls. This room uses it on the walls and the ceiling, in a warm beige, and the whole space feels calm and a little bit Mediterranean without a single tile or arch.
A bucket of limewash costs about the same as good wall paint, and one person can do a wall in a day with a block brush. The trick is to keep your strokes random and to work wet, because stopping mid wall leaves a line you cannot blend away later. It is also one of the few finishes that looks better slightly imperfect, which takes the pressure off.
One tip: do a test patch behind a door first. Limewash dries much lighter than it looks in the bucket, and the color surprises everyone the first time.
9. One Bold Limewash Wall in Deep Red
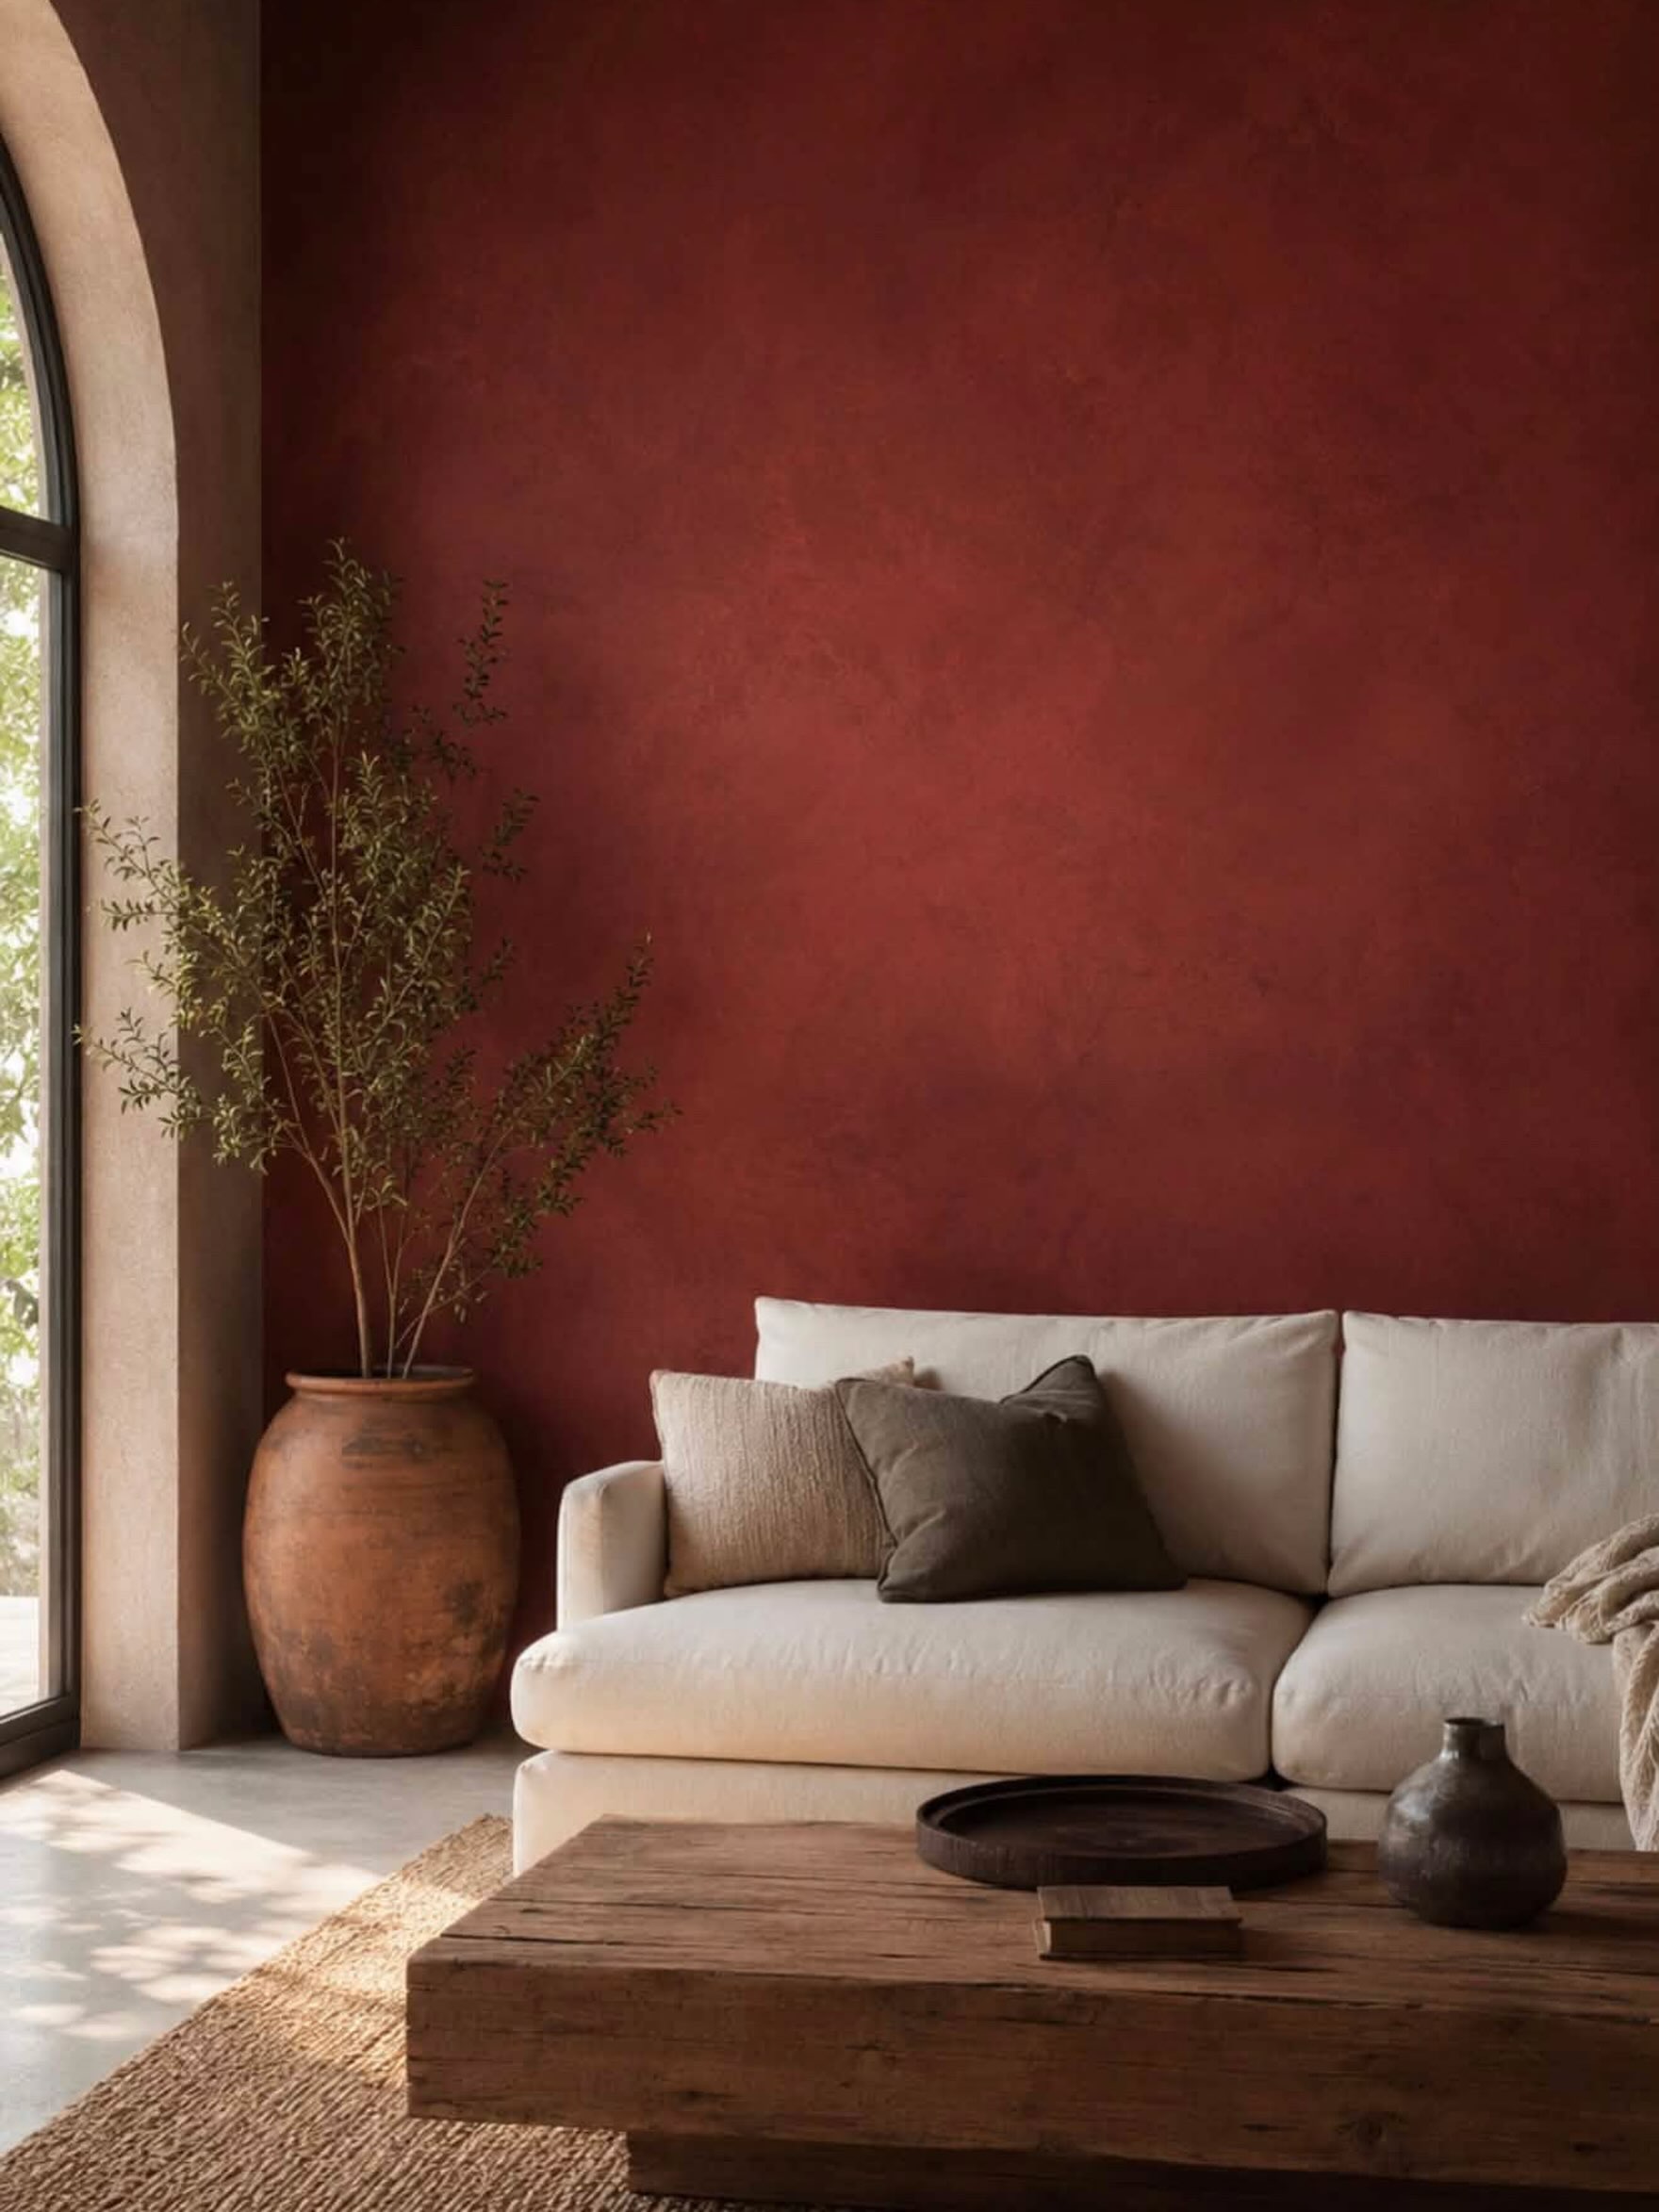
If beige limewash feels too safe, this is the other end of it. A deep red limewash wall behind a plain cream sofa, with a terracotta pot and an arched window beside it. The red is strong, but the cloudy texture keeps it from feeling flat or loud, and the room still reads as calm.
One bold wall is the cheapest statement a room can make. It is a single bucket of paint and a day of brushing, and it changes the room more than new furniture would. Keep everything in front of it quiet, cream linen, bare wood, one plant, and let the wall do the work. If you hate it in a year, limewash paints over like any other paint.
Note this: bold limewash needs two coats and the second one goes on only after the first is fully dry, or the color turns patchy.
10. Limewash Paired With Fluted Paneling
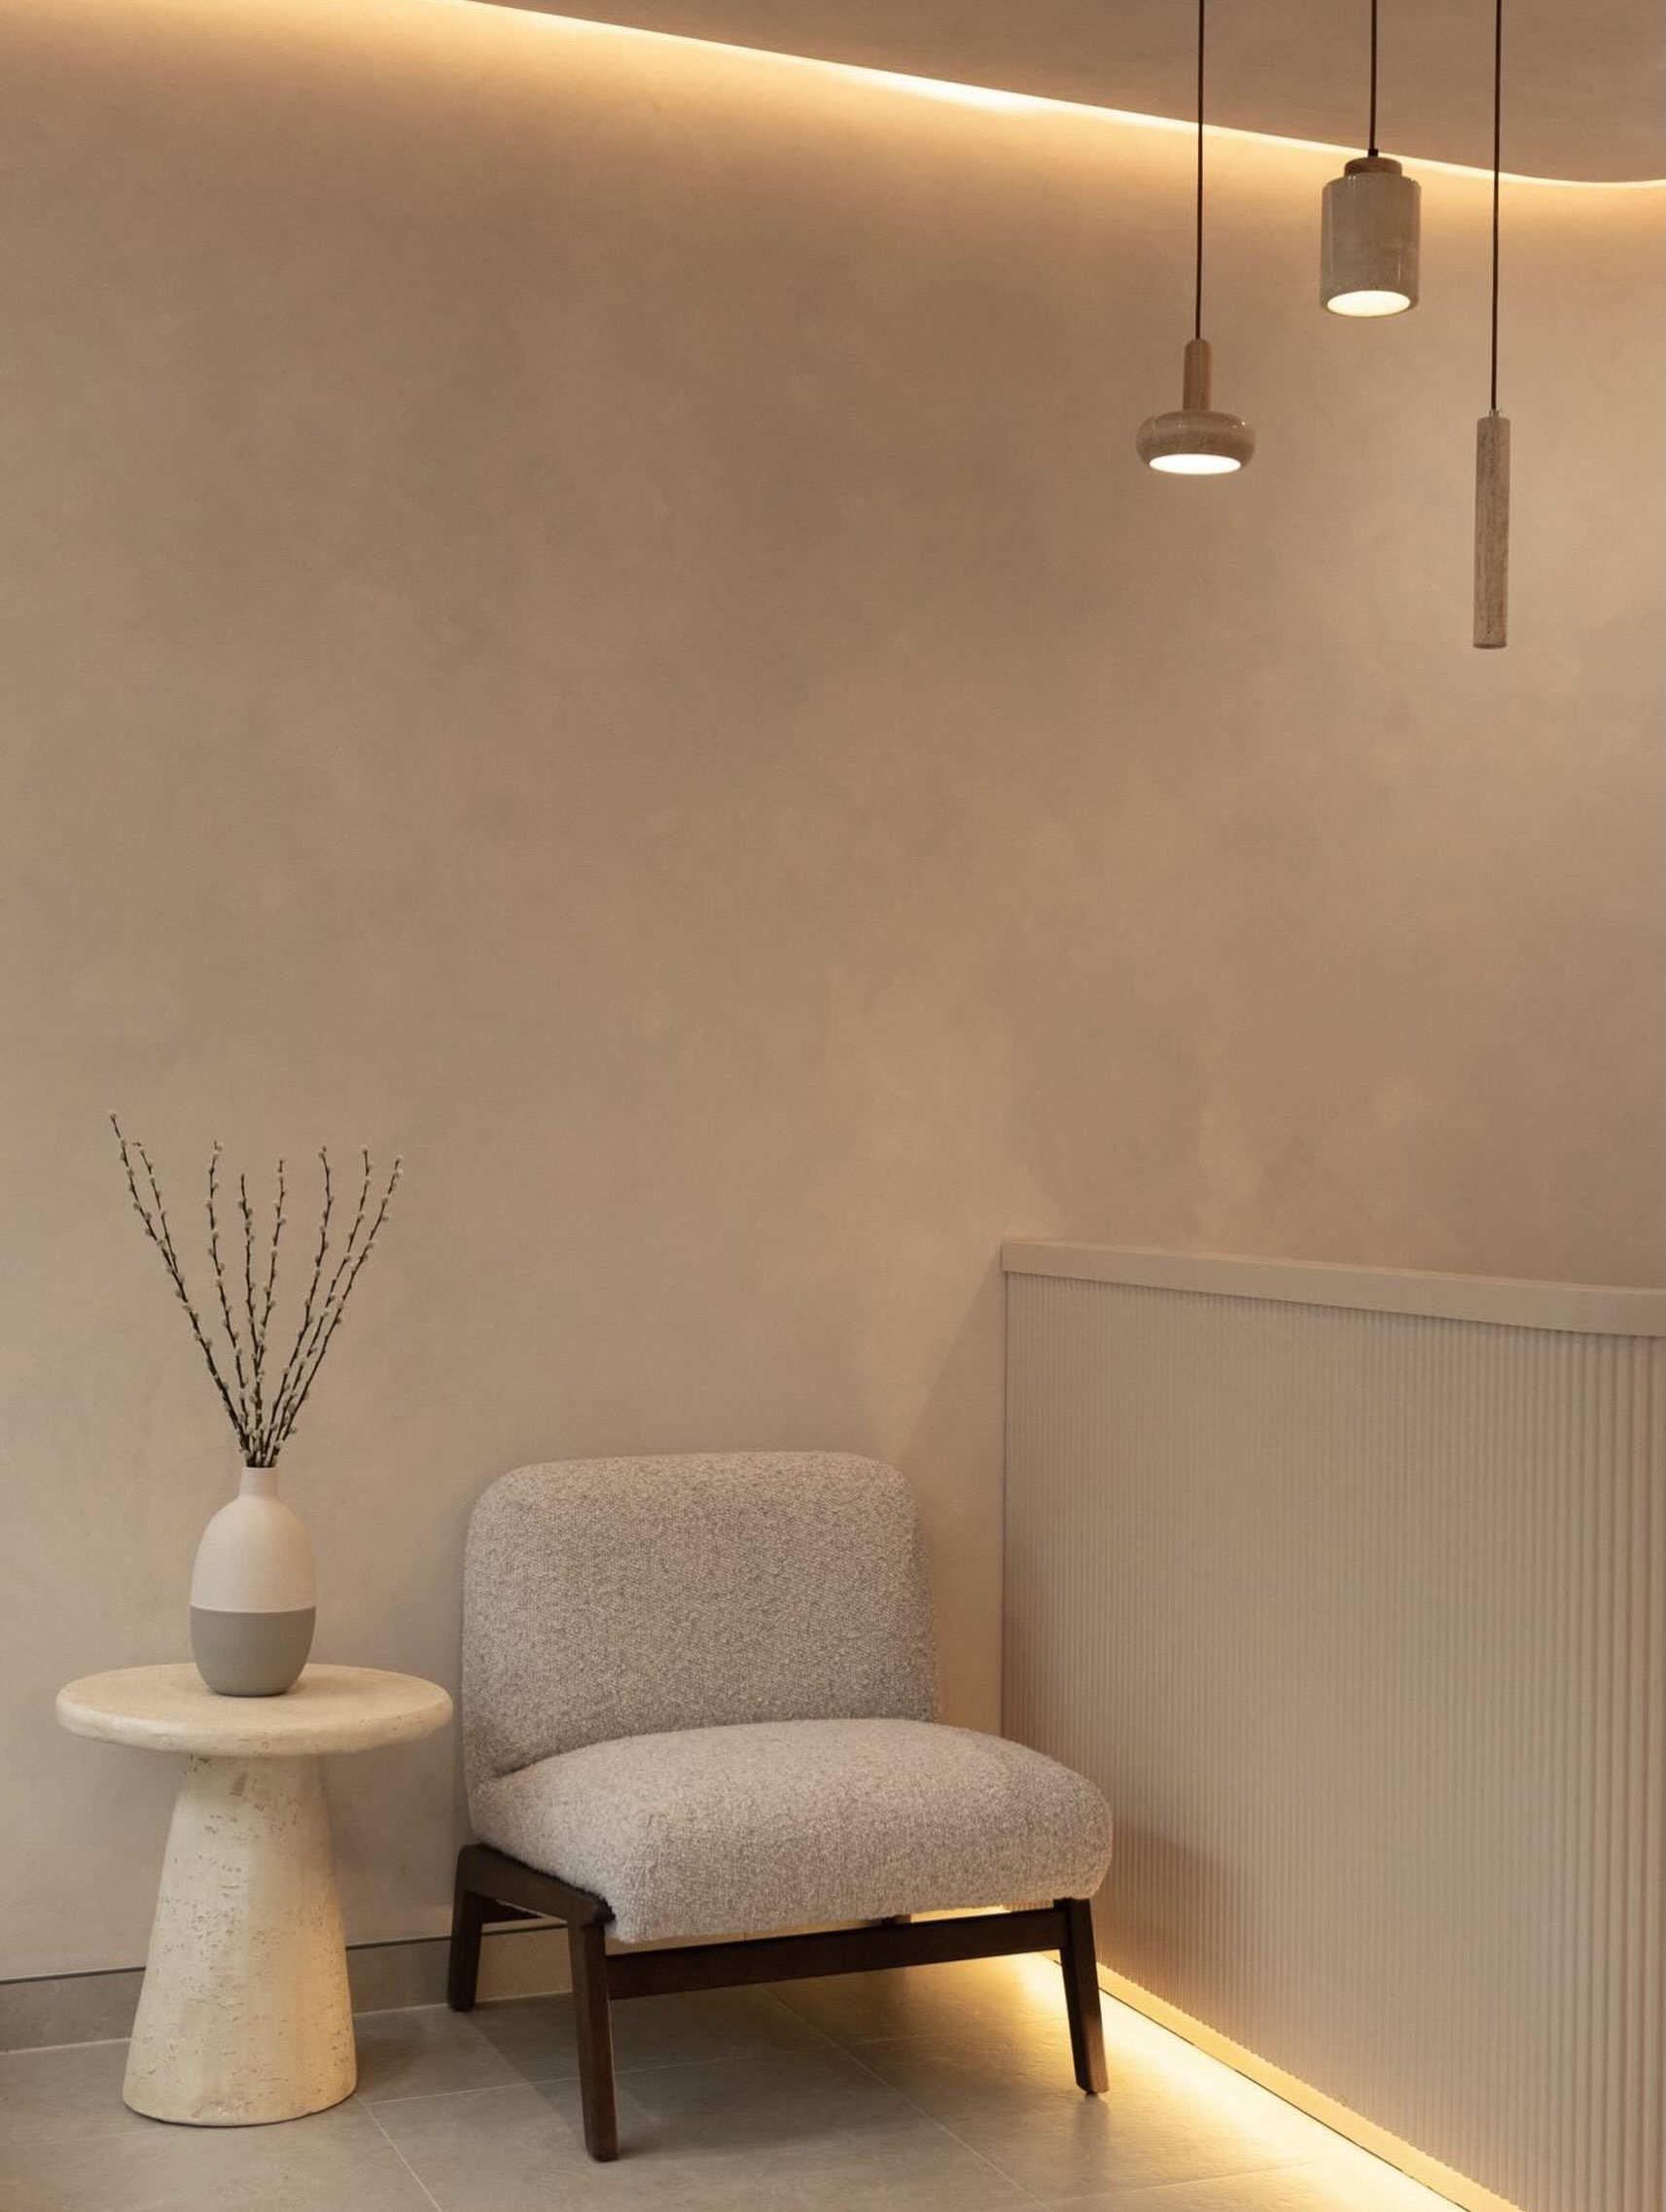
This wall pairs two cheap finishes and they suit each other well. Warm beige limewash on top, slim fluted paneling along the bottom, and a strip of warm light tucked where they meet. The paneling adds the straight lines the limewash does not have, and the light makes both of them look better after dark.
Fluted panels come as lightweight boards now, and they glue straight to the wall, which keeps the job simple. Use them on the lower half of a wall the way you would wainscoting, and keep the limewash above it. The combination costs less than full paneling and looks far more finished than paint alone.
Do this first: plan where the light strip goes before you fix the panels, because running a cable behind them afterwards means taking them down again.
Final Thoughts
The wall I started with, the blank hallway one, ended up with stripes, and I still smile when I walk past it. None of these ideas needed a contractor, and none of them cost more than a weekend and a modest trip to the hardware store. Pick the one that fits the wall you look at most, start small, and let the rest of the house catch up later.
If one of these is going on your wall soon, save this post to your home decor board on Pinterest so you can find the picture again when the paint dries and you need the details.